# NetConnection开发指导
## 场景介绍
NetConnection模块提供了常用网络信息查询的能力。
## 接口说明
NetConnection常用接口如下表所示,详细的接口说明请参考[NetConnection](../reference/apis-network-kit/_net_connection.md)
| 接口名 | 描述 |
| -------- | -------- |
| OH_NetConn_HasDefaultNet(int32_t \*hasDefaultNet) | 检查默认数据网络是否被激活,判断设备是否有网络连接,以便在应用程序中采取相应的措施。 |
| OH_NetConn_GetDefaultNet(NetConn_NetHandle \*netHandle) | 获得默认激活的数据网络。 |
| OH_NetConn_IsDefaultNetMetered(int32_t \*isMetered) | 检查当前网络上的数据流量使用是否被计量 |
| OH_NetConn_GetConnectionProperties(NetConn_NetHandle \*netHandle, NetConn_ConnectionProperties *prop) | 获取netHandle对应的网络的连接信息。 |
| OH_NetConn_GetNetCapabilities (NetConn_NetHandle \*netHandle, NetConn_NetCapabilities \*netCapacities) | 获取netHandle对应的网络的能力信息。 |
| OH_NetConn_GetDefaultHttpProxy (NetConn_HttpProxy \*httpProxy) | 获取网络默认的代理配置信息。 如果设置了全局代理,则会返回全局代理配置信息。如果进程已经绑定到指定netHandle对应的网络,则返回网络句柄对应网络的代理配置信息。在其它情况下,将返回默认网络的代理配置信息。 |
| OH_NetConn_GetAddrInfo (char \*host, char \*serv, struct addrinfo \*hint, struct addrinfo \*\*res, int32_t netId) | 通过netId获取DNS结果。 |
| OH_NetConn_FreeDnsResult(struct addrinfo \*res) | 释放DNS结果内存。 |
| OH_NetConn_GetAllNets(NetConn_NetHandleList \*netHandleList) | 获取所有处于连接状态的网络列表。 |
| OHOS_NetConn_RegisterDnsResolver(OH_NetConn_CustomDnsResolver resolver) | 注册自定义dns解析器。
**弃用:** 从API version 13开始废弃。
**替代:** 推荐使用OH_NetConn_RegisterDnsResolver。|
| OHOS_NetConn_UnregisterDnsResolver(void) | 去注册自定义dns解析器。
**弃用:** 从API version 13开始废弃。
**替代:** 推荐使用OH_NetConn_UnregisterDnsResolver。|
| OH_NetConn_BindSocket(int32_t socketFd, NetConn_NetHandle \*netHandle) | 将套接字与指定的网络进行绑定。 |
| OH_NetConn_RegisterDnsResolver(OH_NetConn_CustomDnsResolver resolver) | 注册自定义dns解析器。 |
| OH_NetConn_UnregisterDnsResolver(void) | 去注册自定义dns解析器。 |
## 网络管理接口开发示例
### 开发步骤
使用本文档涉及接口获取网络相关信息时,需先创建Native C++工程,在源文件中将相关接口封装,再在ArkTS层对封装的接口进行调用,使用hilog或者console.log等手段选择打印在控制台或者生成设备日志。
本文以实现获取默认激活的数据网络为例,给出具体的开发指导。
### 添加开发依赖
**添加动态链接库**
CMakeLists.txt中添加以下lib:
```txt
libace_napi.z.so
libnet_connection.so
```
**头文件**
```c
#include "napi/native_api.h"
#include "network/netmanager/net_connection.h"
#include "network/netmanager/net_connection_type.h"
```
### 构建工程
1、在源文件中编写调用该API的代码,并将结果封装成一个`napi_value`类型的值返回给 Node.js 环境。
```C
// Get the execution results of the default network connection.
static napi_value GetDefaultNet(napi_env env, napi_callback_info info)
{
size_t argc = 1;
napi_value args[1] = {nullptr};
napi_get_cb_info(env, info, &argc, args, nullptr, nullptr);
int32_t param;
napi_get_value_int32(env, args[0], ¶m);
NetConn_NetHandle netHandle;
if (param== 0) {
param= OH_NetConn_GetDefaultNet(NULL);
} else {
param= OH_NetConn_GetDefaultNet(&netHandle);
}
napi_value result;
napi_create_int32(env, param, &result);
return result;
}
// Get the ID of the default network connection.
static napi_value NetId(napi_env env, napi_callback_info info) {
int32_t defaultNetId;
NetConn_NetHandle netHandle;
OH_NetConn_GetDefaultNet(&netHandle);
defaultNetId = netHandle.netId; // Get the default netId
napi_value result;
napi_create_int32(env, defaultNetId, &result);
return result;
}
```
简要说明:这两个函数是用于获取系统默认网络连接的相关信息的。其中,GetDefaultNet是接收ArkTS端传入的测试参数,返回调用接口后对应的返回值,param可以自行调整;如果返回值为0,代表获取成功,401代表参数错误,201代表没有权限;而NetId函数则用于获取默认网络连接的ID。这些信息可以用于进一步的网络操作。
2、将通过napi封装好的`napi_value`类型对象初始化导出,通过外部函数接口,将以上两个函数暴露给JavaScript使用。
```C
EXTERN_C_START
static napi_value Init(napi_env env, napi_value exports)
{
// Information used to describe an exported attribute. Two properties are defined here: `GetDefaultNet` and `NetId`.
napi_property_descriptor desc[] = {
{"GetDefaultNet", nullptr, GetDefaultNet, nullptr, nullptr, nullptr, napi_default, nullptr},
{"NetId", nullptr, NetId, nullptr, nullptr, nullptr, napi_default, nullptr}};
napi_define_properties(env, exports, sizeof(desc) / sizeof(desc[0]), desc);
return exports;
}
EXTERN_C_END
```
3、将上一步中初始化成功的对象通过`RegisterEntryModule`函数,使用`napi_module_register`函数将模块注册到 Node.js 中。
```C
static napi_module demoModule = {
.nm_version = 1,
.nm_flags = 0,
.nm_filename = nullptr,
.nm_register_func = Init,
.nm_modname = "entry",
.nm_priv = ((void*)0),
.reserved = { 0 },
};
extern "C" __attribute__((constructor)) void RegisterEntryModule(void)
{
napi_module_register(&demoModule);
}
```
4、在工程的index.d.ts文件中定义两个函数的类型。
- GetDefaultNet 函数接受一个数字参数 code,返回一个数字类型的值。
- NetId 函数不接受参数,返回一个数字类型的值。
```ts
export const GetDefaultNet: (code: number) => number;
export const NetId: () => number;
```
5、在index.ets文件中对上述封装好的接口进行调用
```ts
import testNetManager from 'libentry.so';
@Entry
@Component
struct Index {
@State message: string = '';
build() {
Row() {
Column() {
Text(this.message)
.fontSize(50)
.fontWeight(FontWeight.Bold)
Button('GetDefaultNet').onClick(event => {
this.GetDefaultNet();
})
Button('CodeNumber').onClick(event =>{
this.CodeNumber();
})
}
.width('100%')
}
.height('100%')
}
GetDefaultNet() {
let netid = testNetManager.NetId();
console.log("The defaultNetId is [" + netid + "]");
}
CodeNumber() {
let testParam = 0;
let codeNumber = testNetManager.GetDefaultNet(testParam);
if (codeNumber === 0) {
console.log("Test success. [" + codeNumber + "]");
} else if (codeNumber === 201) {
console.log("Missing permissions. [" + codeNumber + "]");
} else if (codeNumber === 401) {
console.log("Parameter error. [" + codeNumber + "]");
}
}
}
```
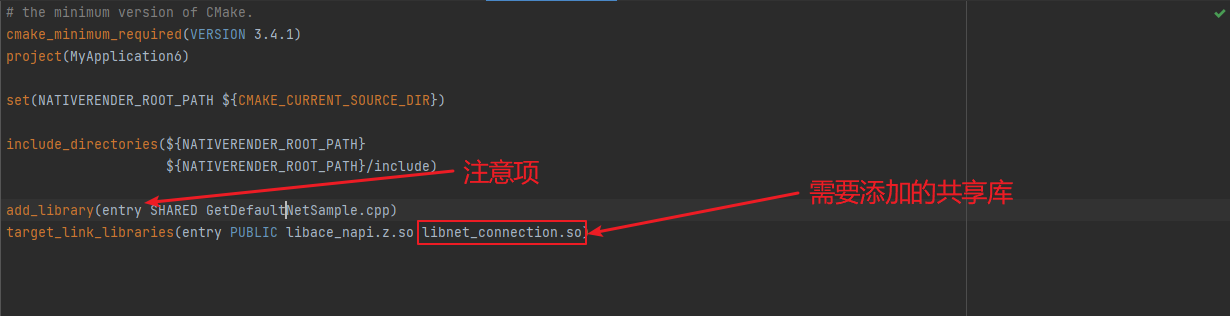
6、配置`CMakeLists.txt`,本模块需要用到的共享库是`libnet_connection.so`,在工程自动生成的`CMakeLists.txt`中的`target_link_libraries`中添加此共享库。
注意:如图所示,在`add_library`中的`entry`是工程自动生成的`modename`,若要做修改,需和步骤3中`.nm_modname`保持一致;
经过以上步骤,整个工程的搭建已经完成,接下来就可以连接设备运行工程进行日志查看了。
## 测试步骤
1、连接设备,使用DevEco Studio打开搭建好的工程
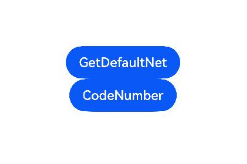
2、运行工程,设备上会弹出以下所示图片:
简要说明:
- 在点击 `GetDefaultNet` 时,获取的是默认网络ID。
- 在点击 `codeNumber` 时,获取的是接口返回的响应状态码。
3、点击 `GetDefaultNet` 按钮,控制台会打印日志:

4、点击 `codeNumber` 按钮,控制台会打印相应的响应状态码:
