# \@Observed装饰器和\@ObjectLink装饰器:嵌套类对象属性变化
上文所述的装饰器仅能观察到第一层的变化,但是在实际应用开发中,应用会根据开发需要,封装自己的数据模型。对于多层嵌套的情况,比如二维数组,或者数组项class,或者class的属性是class,他们的第二层的属性变化是无法观察到的。这就引出了\@Observed/\@ObjectLink装饰器。
\@Observed/\@ObjectLink配套使用是用于嵌套场景的观察,主要是为了弥补装饰器仅能观察一层的能力限制,开发者最好对装饰器的基本观察能力有一定的了解,再来对比阅读该文档。建议提前阅读:[\@State](./arkts-state.md)的基本用法。
> **说明:**
>
> 从API version 9开始,这两个装饰器支持在ArkTS卡片中使用。
>
> 从API version 11开始,这两个装饰器支持在原子化服务中使用。
## 概述
\@ObjectLink和\@Observed类装饰器用于在涉及嵌套对象或数组的场景中进行双向数据同步:
- 使用new创建被\@Observed装饰的类,可以被观察到属性的变化;
- 子组件中\@ObjectLink装饰器装饰的状态变量用于接收\@Observed装饰的类的实例,和父组件中对应的状态变量建立双向数据绑定。这个实例可以是数组中的被\@Observed装饰的项,或者是class object中的属性,这个属性同样也需要被\@Observed装饰。
- \@Observed用于嵌套类场景中,观察对象类属性变化,要配合自定义组件使用(示例详见[嵌套对象](#嵌套对象)),如果要做数据双/单向同步,需要搭配\@ObjectLink或者\@Prop使用(示例详见[\@Prop与\@ObjectLink的差异](#prop与objectlink的差异))。
## 装饰器说明
| \@Observed类装饰器 | 说明 |
| -------------- | --------------------------------- |
| 装饰器参数 | 无 |
| 类装饰器 | 装饰class。需要放在class的定义前,使用new创建类对象。 |
| \@ObjectLink变量装饰器 | 说明 |
| ----------------- | ---------------------------------------- |
| 装饰器参数 | 无 |
| 允许装饰的变量类型 | 必须为被\@Observed装饰的class实例,必须指定类型。
\@ObjectLink不支持简单类型,如果开发者需要使用简单类型,可以使用[\@Prop](arkts-prop.md)。
支持继承Date、[Array](#二维数组)的class实例,API11及以上支持继承[Map](#继承map类)、[Set](#继承set类)的class实例。示例见[观察变化](#观察变化)。
API11及以上支持\@Observed装饰类和undefined或null组成的联合类型,比如ClassA \| ClassB, ClassA \| undefined 或者 ClassA \| null, 示例见[@ObjectLink支持联合类型](#objectlink支持联合类型)。
\@ObjectLink的属性是可以改变的,但是变量的分配是不允许的,也就是说这个装饰器装饰变量是只读的,不能被改变。 |
| 被装饰变量的初始值 | 不允许。 |
\@ObjectLink装饰的数据为可读示例。
```ts
// 允许@ObjectLink装饰的数据属性赋值
this.objLink.a= ...
// 不允许@ObjectLink装饰的数据自身赋值
this.objLink= ...
```
> **说明:**
>
> \@ObjectLink装饰的变量不能被赋值,如果要使用赋值操作,请使用[@Prop](arkts-prop.md)。
>
> - \@Prop装饰的变量和数据源的关系是是单向同步,\@Prop装饰的变量在本地拷贝了数据源,所以它允许本地更改,如果父组件中的数据源有更新,\@Prop装饰的变量本地的修改将被覆盖;
>
> - \@ObjectLink装饰的变量和数据源的关系是双向同步,\@ObjectLink装饰的变量相当于指向数据源的指针。禁止对\@ObjectLink装饰的变量赋值,如果一旦发生\@ObjectLink装饰的变量的赋值,则同步链将被打断。因为\@ObjectLink装饰的变量通过数据源(Object)引用来初始化。对于实现双向数据同步的@ObjectLink,赋值相当于更新父组件中的数组项或者class的属性,TypeScript/JavaScript不能实现,会发生运行时报错。
## 变量的传递/访问规则说明
| \@ObjectLink传递/访问 | 说明 |
| ----------------- | ---------------------------------------- |
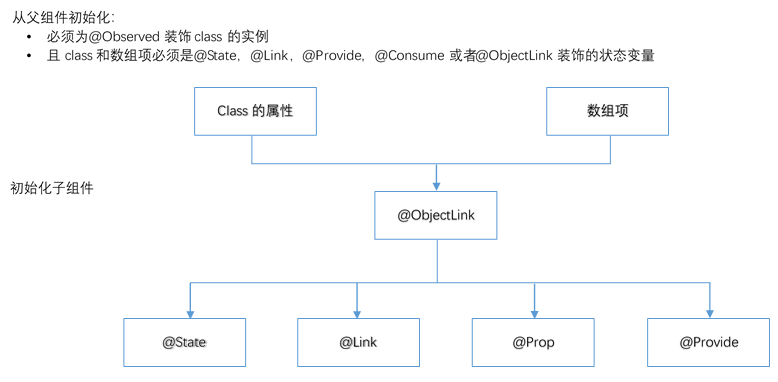
| 从父组件初始化 | 必须指定。
初始化\@ObjectLink装饰的变量必须同时满足以下场景:
- 类型必须是\@Observed装饰的class。
- 初始化的数值需要是数组项,或者class的属性。
- 同步源的class或者数组必须是[\@State](./arkts-state.md),[\@Link](./arkts-link.md),[\@Provide](./arkts-provide-and-consume.md),[\@Consume](./arkts-provide-and-consume.md)或者\@ObjectLink装饰的数据。
同步源是数组项的示例请参考[对象数组](#对象数组)。初始化的class的示例请参考[嵌套对象](#嵌套对象)。 |
| 与源对象同步 | 双向。 |
| 可以初始化子组件 | 允许,可用于初始化常规变量、\@State、\@Link、\@Prop、\@Provide |
**图1** 初始化规则图示
## 观察变化和行为表现
### 观察变化
\@Observed装饰的类,如果其属性为非简单类型,比如class、Object或者数组,也需要被\@Observed装饰,否则将观察不到其属性的变化。
```ts
class Child {
public num: number;
constructor(num: number) {
this.num = num;
}
}
@Observed
class Parent {
public child: Child;
public count: number;
constructor(child: Child, count: number) {
this.child = child;
this.count = count;
}
}
```
以上示例中,Parent被\@Observed装饰,其成员变量的赋值的变化是可以被观察到的,但对于Child,没有被\@Observed装饰,其属性的修改不能被观察到。
```ts
@ObjectLink parent: Parent;
// 赋值变化可以被观察到
this.parent.child = new Child(5);
this.parent.count = 5;
// Child没有被@Observed装饰,其属性的变化观察不到
this.parent.child.num = 5;
```
\@ObjectLink:\@ObjectLink只能接收被\@Observed装饰class的实例,推荐设计单独的自定义组件来渲染每一个数组或对象。此时,对象数组或嵌套对象(属性是对象的对象称为嵌套对象)需要两个自定义组件,一个自定义组件呈现外部数组/对象,另一个自定义组件呈现嵌套在数组/对象内的类对象。可以观察到:
- 其属性的数值的变化,其中属性是指Object.keys(observedObject)返回的所有属性,示例请参考[嵌套对象](#嵌套对象)。
- 如果数据源是数组,则可以观察到数组item的替换,如果数据源是class,可观察到class的属性的变化,示例请参考[对象数组](#对象数组)。
继承Date的class时,可以观察到Date整体的赋值,同时可通过调用Date的接口`setFullYear`, `setMonth`, `setDate`, `setHours`, `setMinutes`, `setSeconds`, `setMilliseconds`, `setTime`, `setUTCFullYear`, `setUTCMonth`, `setUTCDate`, `setUTCHours`, `setUTCMinutes`, `setUTCSeconds`, `setUTCMilliseconds` 更新Date的属性。
```ts
@Observed
class DateClass extends Date {
constructor(args: number | string) {
super(args);
}
}
@Observed
class NewDate {
public data: DateClass;
constructor(data: DateClass) {
this.data = data;
}
}
@Component
struct Child {
label: string = 'date';
@ObjectLink data: DateClass;
build() {
Column() {
Button(`child increase the day by 1`)
.onClick(() => {
this.data.setDate(this.data.getDate() + 1);
})
DatePicker({
start: new Date('1970-1-1'),
end: new Date('2100-1-1'),
selected: this.data
})
}
}
}
@Entry
@Component
struct Parent {
@State newData: NewDate = new NewDate(new DateClass('2023-1-1'));
build() {
Column() {
Child({ label: 'date', data: this.newData.data })
Button(`parent update the new date`)
.onClick(() => {
this.newData.data = new DateClass('2023-07-07');
})
Button(`ViewB: this.newData = new NewDate(new DateClass('2023-08-20'))`)
.onClick(() => {
this.newData = new NewDate(new DateClass('2023-08-20'));
})
}
}
}
```
继承Map的class时,可以观察到Map整体的赋值,同时可通过调用Map的接口`set`, `clear`, `delete` 更新Map的值。详见[继承Map类](#继承map类)。
继承Set的class时,可以观察到Set整体的赋值,同时可通过调用Set的接口`add`, `clear`, `delete` 更新Set的值。详见[继承Set类](#继承set类)。
### 框架行为
1. 初始渲染:
a. \@Observed装饰的class的实例会被不透明的代理对象包装,代理了class上的属性的setter和getter方法。
b. 子组件中\@ObjectLink装饰的从父组件初始化,接收被\@Observed装饰的class的实例,\@ObjectLink的包装类会将自己注册给\@Observed class。
2. 属性更新:当\@Observed装饰的class属性改变时,会执行到代理的setter和getter,然后遍历依赖它的\@ObjectLink包装类,通知数据更新。
## 限制条件
1. 使用\@Observed装饰class会改变class原始的原型链,\@Observed和其他类装饰器装饰同一个class可能会带来问题。
2. \@ObjectLink装饰器不能在\@Entry装饰的自定义组件中使用。
3. \@ObjectLink装饰的变量类型需要为显式的被@Observed装饰的类,如果未指定类型,或其不是\@Observed装饰的class,编译期会报错。
```ts
@Observed
class Info {
count: number;
constructor(count: number) {
this.count = count;
}
}
class Test {
msg: number;
constructor(msg: number) {
this.msg = msg;
}
}
// 错误写法,count未指定类型,编译报错
@ObjectLink count;
// 错误写法,Test未被@Observed装饰,编译报错
@ObjectLink test: Test;
// 正确写法
@ObjectLink count: Info;
```
4. \@ObjectLink装饰的变量不能本地初始化,仅能通过构造参数从父组件传入初始值,否则编译期会报错。
```ts
@Observed
class Info {
count: number;
constructor(count: number) {
this.count = count;
}
}
// 错误写法,编译报错
@ObjectLink count: Info = new Info(10);
// 正确写法
@ObjectLink count: Info;
```
5. \@ObjectLink装饰的变量是只读的,不能被赋值,否则会有运行时报错提示Cannot set property when setter is undefined。如果需要对\@ObjectLink装饰的变量进行整体替换,可以在父组件对其进行整体替换。
【反例】
```ts
@Observed
class Info {
count: number;
constructor(count: number) {
this.count = count;
}
}
@Component
struct Child {
@ObjectLink num: Info;
build() {
Column() {
Text(`num的值: ${this.num.count}`)
.onClick(() => {
// 错误写法,@ObjectLink装饰的变量不能被赋值
this.num = new Info(10);
})
}
}
}
@Entry
@Component
struct Parent {
@State num: Info = new Info(10);
build() {
Column() {
Text(`count的值: ${this.num.count}`)
Child({num: this.num})
}
}
}
```
【正例】
```ts
@Observed
class Info {
count: number;
constructor(count: number) {
this.count = count;
}
}
@Component
struct Child {
@ObjectLink num: Info;
build() {
Column() {
Text(`num的值: ${this.num.count}`)
.onClick(() => {
// 正确写法,可以更改@ObjectLink装饰变量的成员属性
this.num.count = 20;
})
}
}
}
@Entry
@Component
struct Parent {
@State num: Info = new Info(10);
build() {
Column() {
Text(`count的值: ${this.num.count}`)
Button('click')
.onClick(() => {
// 可以在父组件做整体替换
this.num = new Info(30);
})
Child({num: this.num})
}
}
}
```
## 使用场景
### 嵌套对象
> **说明:**
>
> NextID是用来在[ForEach循环渲染](./arkts-rendering-control-foreach.md)过程中,为每个数组元素生成一个唯一且持久的键值,用于标识对应的组件。
```ts
// objectLinkNestedObjects.ets
let NextID: number = 1;
@Observed
class Bag {
public id: number;
public size: number;
constructor(size: number) {
this.id = NextID++;
this.size = size;
}
}
@Observed
class User {
public bag: Bag;
constructor(bag: Bag) {
this.bag = bag;
}
}
@Observed
class Book {
public bookName: BookName;
constructor(bookName: BookName) {
this.bookName = bookName;
}
}
@Observed
class BookName extends Bag {
public nameSize: number;
constructor(nameSize: number) {
// 调用父类方法对nameSize进行处理
super(nameSize);
this.nameSize = nameSize;
}
}
@Component
struct Son {
label: string = 'Son';
@ObjectLink bag: Bag;
build() {
Column() {
Text(`Son [${this.label}] this.bag.size = ${this.bag.size}`)
.fontColor('#ffffffff')
.backgroundColor('#ff3d9dba')
.width(320)
.height(50)
.borderRadius(25)
.margin(10)
.textAlign(TextAlign.Center)
Button(`Son: this.bag.size add 1`)
.width(320)
.backgroundColor('#ff17a98d')
.margin(10)
.onClick(() => {
this.bag.size += 1;
})
}
}
}
@Component
struct Father {
label: string = 'Father';
@ObjectLink bookName: BookName;
build() {
Row() {
Column() {
Text(`Father [${this.label}] this.bookName.size = ${this.bookName.size}`)
.fontColor('#ffffffff')
.backgroundColor('#ff3d9dba')
.width(320)
.height(50)
.borderRadius(25)
.margin(10)
.textAlign(TextAlign.Center)
Button(`Father: this.bookName.size add 1`)
.width(320)
.backgroundColor('#ff17a98d')
.margin(10)
.onClick(() => {
this.bookName.size += 1;
console.log('this.bookName.size:' + this.bookName.size);
})
}
.width(320)
}
}
}
@Entry
@Component
struct GrandFather {
@State user: User = new User(new Bag(0));
@State child: Book = new Book(new BookName(0));
build() {
Column() {
Son({ label: 'Son #1', bag: this.user.bag })
.width(320)
Father({ label: 'Father #3', bookName: this.child.bookName })
.width(320)
Button(`GrandFather: this.child.bookName.size add 10`)
.width(320)
.backgroundColor('#ff17a98d')
.margin(10)
.onClick(() => {
this.child.bookName.size += 10;
console.log('this.child.bookName.size:' + this.child.bookName.size);
})
Button(`GrandFather: this.user.bag = new Bag(10)`)
.width(320)
.backgroundColor('#ff17a98d')
.margin(10)
.onClick(() => {
this.user.bag = new Bag(10);
})
Button(`GrandFather: this.user = new User(new Bag(20))`)
.width(320)
.backgroundColor('#ff17a98d')
.margin(10)
.onClick(() => {
this.user = new User(new Bag(20));
})
}
}
}
```

被@Observed装饰的BookName类,可以观测到继承基类的属性的变化。
GrandFather中的事件句柄:
- this.user.bag = new Bag(10) 和this.user = new User(new Bag(20)): 对@State装饰的变量user和其属性的修改。
- this.child.bookName.size += ... :该变化属于第二层的变化,@State无法观察到第二层的变化,但是Bag被\@Observed装饰,Bag的属性size的变化可以被\@ObjectLink观察到。
Father中的事件句柄:
- this.bookName.size += 1:对\@ObjectLink变量size的修改,将触发Text组件的刷新。\@ObjectLink和\@Prop不同,\@ObjectLink不拷贝来自父组件的数据源,而是在本地构建了指向其数据源的引用。
- \@ObjectLink变量是只读的,this.bookName = new bookName(...)是不允许的,因为一旦赋值操作发生,指向数据源的引用将被重置,同步将被打断。
### 对象数组
对象数组是一种常用的数据结构。以下示例展示了数组对象的用法。
```ts
let NextID: number = 1;
@Observed
class Info {
public id: number;
public info: number;
constructor(info: number) {
this.id = NextID++;
this.info = info;
}
}
@Component
struct Child {
// 子组件Child的@ObjectLink的类型是Info
@ObjectLink info: Info;
label: string = 'ViewChild';
build() {
Row() {
Button(`ViewChild [${this.label}] this.info.info = ${this.info ? this.info.info : "undefined"}`)
.width(320)
.margin(10)
.onClick(() => {
this.info.info += 1;
})
}
}
}
@Entry
@Component
struct Parent {
// Parent中有@State装饰的Info[]
@State arrA: Info[] = [new Info(0), new Info(0)];
build() {
Column() {
ForEach(this.arrA,
(item: Info) => {
Child({ label: `#${item.id}`, info: item })
},
(item: Info): string => item.id.toString()
)
// 使用@State装饰的数组的数组项初始化@ObjectLink,其中数组项是被@Observed装饰的Info的实例
Child({ label: `ViewChild this.arrA[first]`, info: this.arrA[0] })
Child({ label: `ViewChild this.arrA[last]`, info: this.arrA[this.arrA.length-1] })
Button(`ViewParent: reset array`)
.width(320)
.margin(10)
.onClick(() => {
this.arrA = [new Info(0), new Info(0)];
})
Button(`ViewParent: push`)
.width(320)
.margin(10)
.onClick(() => {
this.arrA.push(new Info(0));
})
Button(`ViewParent: shift`)
.width(320)
.margin(10)
.onClick(() => {
if (this.arrA.length > 0) {
this.arrA.shift();
} else {
console.log("length <= 0");
}
})
Button(`ViewParent: item property in middle`)
.width(320)
.margin(10)
.onClick(() => {
this.arrA[Math.floor(this.arrA.length / 2)].info = 10;
})
Button(`ViewParent: item property in middle`)
.width(320)
.margin(10)
.onClick(() => {
this.arrA[Math.floor(this.arrA.length / 2)] = new Info(11);
})
}
}
}
```

- this.arrA[Math.floor(this.arrA.length/2)] = new Info(..) :该状态变量的改变触发2次更新:
1. ForEach:数组项的赋值导致ForEach的[itemGenerator](../reference/apis-arkui/arkui-ts/ts-rendering-control-foreach.md)被修改,因此数组项被识别为有更改,ForEach的item builder将执行,创建新的Child组件实例。
2. Child({ label: `ViewChild this.arrA[last]`, info: this.arrA[this.arrA.length-1] }):上述更改改变了数组中第二个元素,所以绑定this.arrA[1]的Child将被更新。
- this.arrA.push(new Info(0)) : 将触发2次不同效果的更新:
1. ForEach:新添加的Info对象对于ForEach是未知的[itemGenerator](../reference/apis-arkui/arkui-ts/ts-rendering-control-foreach.md),ForEach的item builder将执行,创建新的Child组件实例。
2. Child({ label: `ViewChild this.arrA[last]`, info: this.arrA[this.arrA.length-1] }):数组的最后一项有更改,因此引起第二个Child的实例的更改。对于Child({ label: `ViewChild this.arrA[first]`, info: this.arrA[0] }),数组的更改并没有触发一个数组项更改的改变,所以第一个Child不会刷新。
- this.arrA[Math.floor(this.arrA.length/2)].info:@State无法观察到第二层的变化,但是Info被\@Observed装饰,Info的属性的变化将被\@ObjectLink观察到。
### 二维数组
使用\@Observed观察二维数组的变化。可以声明一个被\@Observed装饰的继承Array的子类。
```ts
@Observed
class ObservedArray extends Array {
constructor(args: T[]) {
super(...args);
}
}
```
声明一个继承自Array的类ObservedArray\并使用new操作符创建ObservedArray\的实例。通过new操作符创建的ObservedArray的实例可以观察到属性变化。
在下面的示例中,展示了如何利用\@Observed观察二维数组的变化。
```ts
@Observed
class ObservedArray extends Array {
constructor(args: T[]) {
super(...args);
}
}
@Component
struct Item {
@ObjectLink itemArr: ObservedArray;
build() {
Row() {
ForEach(this.itemArr, (item: string, index: number) => {
Text(`${index}: ${item}`)
.width(100)
.height(100)
}, (item: string) => item)
}
}
}
@Entry
@Component
struct IndexPage {
@State arr: Array> = [new ObservedArray(['apple']), new ObservedArray(['banana']), new ObservedArray(['orange'])];
build() {
Column() {
ForEach(this.arr, (itemArr: ObservedArray) => {
Item({ itemArr: itemArr })
})
Divider()
Button('push two-dimensional array item')
.margin(10)
.onClick(() => {
this.arr[0].push('strawberry');
})
Button('push array item')
.margin(10)
.onClick(() => {
this.arr.push(new ObservedArray(['pear']));
})
Button('change two-dimensional array first item')
.margin(10)
.onClick(() => {
this.arr[0][0] = 'APPLE';
})
Button('change array first item')
.margin(10)
.onClick(() => {
this.arr[0] = new ObservedArray(['watermelon']);
})
}
}
}
```

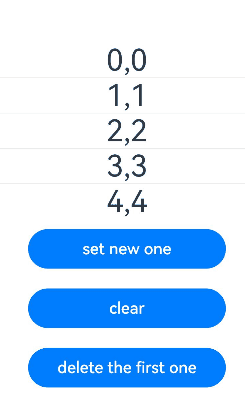
### 继承Map类
> **说明:**
>
> 从API version 11开始,\@ObjectLink支持\@Observed装饰Map类型和继承Map类的类型。
在下面的示例中,myMap类型为MyMap\,点击Button改变myMap的属性,视图会随之刷新。
```ts
@Observed
class Info {
public info: MyMap;
constructor(info: MyMap) {
this.info = info;
}
}
@Observed
export class MyMap extends Map {
public name: string;
constructor(name?: string, args?: [K, V][]) {
super(args);
this.name = name ? name : "My Map";
}
getName() {
return this.name;
}
}
@Entry
@Component
struct MapSampleNested {
@State message: Info = new Info(new MyMap("myMap", [[0, "a"], [1, "b"], [3, "c"]]));
build() {
Row() {
Column() {
MapSampleNestedChild({ myMap: this.message.info })
}
.width('100%')
}
.height('100%')
}
}
@Component
struct MapSampleNestedChild {
@ObjectLink myMap: MyMap;
build() {
Row() {
Column() {
ForEach(Array.from(this.myMap.entries()), (item: [number, string]) => {
Text(`${item[0]}`).fontSize(30)
Text(`${item[1]}`).fontSize(30)
Divider().strokeWidth(5)
})
Button('set new one')
.width(200)
.margin(10)
.onClick(() => {
this.myMap.set(4, "d");
})
Button('clear')
.width(200)
.margin(10)
.onClick(() => {
this.myMap.clear();
})
Button('replace the first one')
.width(200)
.margin(10)
.onClick(() => {
this.myMap.set(0, "aa");
})
Button('delete the first one')
.width(200)
.margin(10)
.onClick(() => {
this.myMap.delete(0);
})
}
.width('100%')
}
.height('100%')
}
}
```

### 继承Set类
> **说明:**
>
> 从API version 11开始,\@ObjectLink支持\@Observed装饰Set类型和继承Set类的类型。
在下面的示例中,mySet类型为MySet\,点击Button改变mySet的属性,视图会随之刷新。
```ts
@Observed
class Info {
public info: MySet;
constructor(info: MySet) {
this.info = info;
}
}
@Observed
export class MySet extends Set {
public name: string;
constructor(name?: string, args?: T[]) {
super(args);
this.name = name ? name : "My Set";
}
getName() {
return this.name;
}
}
@Entry
@Component
struct SetSampleNested {
@State message: Info = new Info(new MySet("Set", [0, 1, 2, 3, 4]));
build() {
Row() {
Column() {
SetSampleNestedChild({ mySet: this.message.info })
}
.width('100%')
}
.height('100%')
}
}
@Component
struct SetSampleNestedChild {
@ObjectLink mySet: MySet;
build() {
Row() {
Column() {
ForEach(Array.from(this.mySet.entries()), (item: [number, number]) => {
Text(`${item}`).fontSize(30)
Divider()
})
Button('set new one')
.width(200)
.margin(10)
.onClick(() => {
this.mySet.add(5);
})
Button('clear')
.width(200)
.margin(10)
.onClick(() => {
this.mySet.clear();
})
Button('delete the first one')
.width(200)
.margin(10)
.onClick(() => {
this.mySet.delete(0);
})
}
.width('100%')
}
.height('100%')
}
}
```
## ObjectLink支持联合类型
@ObjectLink支持@Observed装饰类和undefined或null组成的联合类型,在下面的示例中,count类型为Source | Data | undefined,点击父组件Parent中的Button改变count的属性或者类型,Child中也会对应刷新。
```ts
@Observed
class Source {
public source: number;
constructor(source: number) {
this.source = source;
}
}
@Observed
class Data {
public data: number;
constructor(data: number) {
this.data = data;
}
}
@Entry
@Component
struct Parent {
@State count: Source | Data | undefined = new Source(10);
build() {
Column() {
Child({ count: this.count })
Button('change count property')
.margin(10)
.onClick(() => {
// 判断count的类型,做属性的更新
if (this.count instanceof Source) {
this.count.source += 1;
} else if (this.count instanceof Data) {
this.count.data += 1;
} else {
console.info('count is undefined, cannot change property');
}
})
Button('change count to Source')
.margin(10)
.onClick(() => {
// 赋值为Source的实例
this.count = new Source(100);
})
Button('change count to Data')
.margin(10)
.onClick(() => {
// 赋值为Data的实例
this.count = new Data(100);
})
Button('change count to undefined')
.margin(10)
.onClick(() => {
// 赋值为undefined
this.count = undefined;
})
}.width('100%')
}
}
@Component
struct Child {
@ObjectLink count: Source | Data | undefined;
build() {
Column() {
Text(`count is instanceof ${this.count instanceof Source ? 'Source' :
this.count instanceof Data ? 'Data' : 'undefined'}`)
.fontSize(30)
.margin(10)
Text(`count's property is ${this.count instanceof Source ? this.count.source : this.count?.data}`).fontSize(15)
}.width('100%')
}
}
```

## 常见问题
### 在子组件中给@ObjectLink装饰的变量赋值
在子组件中给@ObjectLink装饰的变量赋值是不允许的。
【反例】
```ts
@Observed
class Info {
public info: number = 0;
constructor(info: number) {
this.info = info;
}
}
@Component
struct ObjectLinkChild {
@ObjectLink testNum: Info;
build() {
Text(`ObjectLinkChild testNum ${this.testNum.info}`)
.onClick(() => {
// ObjectLink不能被赋值
this.testNum = new Info(47);
})
}
}
@Entry
@Component
struct Parent {
@State testNum: Info[] = [new Info(1)];
build() {
Column() {
Text(`Parent testNum ${this.testNum[0].info}`)
.onClick(() => {
this.testNum[0].info += 1;
})
ObjectLinkChild({ testNum: this.testNum[0] })
}
}
}
```
点击ObjectLinkChild给\@ObjectLink装饰的变量赋值:
```
this.testNum = new Info(47);
```
这是不允许的,对于实现双向数据同步的\@ObjectLink,赋值相当于要更新父组件中的数组项或者class的属性,这个对于 TypeScript/JavaScript是不能实现的。框架对于这种行为会发生运行时报错。
【正例】
```ts
@Observed
class Info {
public info: number = 0;
constructor(info: number) {
this.info = info;
}
}
@Component
struct ObjectLinkChild {
@ObjectLink testNum: Info;
build() {
Text(`ObjectLinkChild testNum ${this.testNum.info}`)
.onClick(() => {
// 可以对ObjectLink装饰对象的属性赋值
this.testNum.info = 47;
})
}
}
@Entry
@Component
struct Parent {
@State testNum: Info[] = [new Info(1)];
build() {
Column() {
Text(`Parent testNum ${this.testNum[0].info}`)
.onClick(() => {
this.testNum[0].info += 1;
})
ObjectLinkChild({ testNum: this.testNum[0] })
}
}
}
```
### 基础嵌套对象属性更改失效
在应用开发中,有很多嵌套对象场景,例如,开发者更新了某个属性,但UI没有进行对应的更新。
每个装饰器都有自己可以观察的能力,并不是所有的改变都可以被观察到,只有可以被观察到的变化才会进行UI更新。\@Observed装饰器可以观察到嵌套对象的属性变化,其他装饰器仅能观察到第一层的变化。
【反例】
下面的例子中,一些UI组件并不会更新。
```ts
class Parent {
parentId: number;
constructor(parentId: number) {
this.parentId = parentId;
}
getParentId(): number {
return this.parentId;
}
setParentId(parentId: number): void {
this.parentId = parentId;
}
}
class Child {
childId: number;
constructor(childId: number) {
this.childId = childId;
}
getChildId(): number {
return this.childId;
}
setChildId(childId: number): void {
this.childId = childId;
}
}
class Cousin extends Parent {
cousinId: number = 47;
child: Child;
constructor(parentId: number, cousinId: number, childId: number) {
super(parentId);
this.cousinId = cousinId;
this.child = new Child(childId);
}
getCousinId(): number {
return this.cousinId;
}
setCousinId(cousinId: number): void {
this.cousinId = cousinId;
}
getChild(): number {
return this.child.getChildId();
}
setChild(childId: number): void {
return this.child.setChildId(childId);
}
}
@Entry
@Component
struct MyView {
@State cousin: Cousin = new Cousin(10, 20, 30);
build() {
Column({ space: 10 }) {
Text(`parentId: ${this.cousin.parentId}`)
Button("Change Parent.parent")
.onClick(() => {
this.cousin.parentId += 1;
})
Text(`cousinId: ${this.cousin.cousinId}`)
Button("Change Cousin.cousinId")
.onClick(() => {
this.cousin.cousinId += 1;
})
Text(`childId: ${this.cousin.child.childId}`)
Button("Change Cousin.Child.childId")
.onClick(() => {
// 点击时上面的Text组件不会刷新
this.cousin.child.childId += 1;
})
}
}
}
```
- 最后一个Text组件Text('child: ${this.cousin.child.childId}'),当点击该组件时UI不会刷新。 因为,\@State cousin : Cousin 只能观察到this.cousin属性的变化,比如this.cousin.parentId, this.cousin.cousinId 和this.cousin.child的变化,但是无法观察嵌套在属性中的属性,即this.cousin.child.childId(属性childId是内嵌在cousin中的对象Child的属性)。
- 为了观察到嵌套于内部的Child的属性,需要做如下改变:
- 构造一个子组件,用于单独渲染Child的实例。 该子组件可以使用\@ObjectLink child : Child或\@Prop child : Child。通常会使用\@ObjectLink,除非子组件需要对其Child对象进行本地修改。
- 嵌套的Child必须用\@Observed装饰。当在Cousin中创建Child对象时(本示例中的Cousin(10, 20, 30)),它将被包装在ES6代理中,当Child属性更改时(this.cousin.child.childId += 1),该代码将修改通知到\@ObjectLink变量。
【正例】
以下示例使用\@Observed/\@ObjectLink来观察嵌套对象的属性更改。
```ts
class Parent {
parentId: number;
constructor(parentId: number) {
this.parentId = parentId;
}
getParentId(): number {
return this.parentId;
}
setParentId(parentId: number): void {
this.parentId = parentId;
}
}
@Observed
class Child {
childId: number;
constructor(childId: number) {
this.childId = childId;
}
getChildId(): number {
return this.childId;
}
setChildId(childId: number): void {
this.childId = childId;
}
}
class Cousin extends Parent {
cousinId: number = 47;
child: Child;
constructor(parentId: number, cousinId: number, childId: number) {
super(parentId);
this.cousinId = cousinId;
this.child = new Child(childId);
}
getCousinId(): number {
return this.cousinId;
}
setCousinId(cousinId: number): void {
this.cousinId = cousinId;
}
getChild(): number {
return this.child.getChildId();
}
setChild(childId: number): void {
return this.child.setChildId(childId);
}
}
@Component
struct ViewChild {
@ObjectLink child: Child;
build() {
Column({ space: 10 }) {
Text(`childId: ${this.child.getChildId()}`)
Button("Change childId")
.onClick(() => {
this.child.setChildId(this.child.getChildId() + 1);
})
}
}
}
@Entry
@Component
struct MyView {
@State cousin: Cousin = new Cousin(10, 20, 30);
build() {
Column({ space: 10 }) {
Text(`parentId: ${this.cousin.parentId}`)
Button("Change Parent.parentId")
.onClick(() => {
this.cousin.parentId += 1;
})
Text(`cousinId: ${this.cousin.cousinId}`)
Button("Change Cousin.cousinId")
.onClick(() => {
this.cousin.cousinId += 1;
})
ViewChild({ child: this.cousin.child }) // Text(`childId: ${this.cousin.child.childId}`)的替代写法
Button("Change Cousin.Child.childId")
.onClick(() => {
this.cousin.child.childId += 1;
})
}
}
}
```
### 复杂嵌套对象属性更改失效
【反例】
以下示例创建了一个带有\@ObjectLink装饰变量的子组件,用于渲染一个含有嵌套属性的ParentCounter,用\@Observed装饰嵌套在ParentCounter中的SubCounter。
```ts
let nextId = 1;
@Observed
class SubCounter {
counter: number;
constructor(c: number) {
this.counter = c;
}
}
@Observed
class ParentCounter {
id: number;
counter: number;
subCounter: SubCounter;
incrCounter() {
this.counter++;
}
incrSubCounter(c: number) {
this.subCounter.counter += c;
}
setSubCounter(c: number): void {
this.subCounter.counter = c;
}
constructor(c: number) {
this.id = nextId++;
this.counter = c;
this.subCounter = new SubCounter(c);
}
}
@Component
struct CounterComp {
@ObjectLink value: ParentCounter;
build() {
Column({ space: 10 }) {
Text(`${this.value.counter}`)
.fontSize(25)
.onClick(() => {
this.value.incrCounter();
})
Text(`${this.value.subCounter.counter}`)
.onClick(() => {
this.value.incrSubCounter(1);
})
Divider().height(2)
}
}
}
@Entry
@Component
struct ParentComp {
@State counter: ParentCounter[] = [new ParentCounter(1), new ParentCounter(2), new ParentCounter(3)];
build() {
Row() {
Column() {
CounterComp({ value: this.counter[0] })
CounterComp({ value: this.counter[1] })
CounterComp({ value: this.counter[2] })
Divider().height(5)
ForEach(this.counter,
(item: ParentCounter) => {
CounterComp({ value: item })
},
(item: ParentCounter) => item.id.toString()
)
Divider().height(5)
// 第一个点击事件
Text('Parent: incr counter[0].counter')
.fontSize(20).height(50)
.onClick(() => {
this.counter[0].incrCounter();
// 每次触发时自增10
this.counter[0].incrSubCounter(10);
})
// 第二个点击事件
Text('Parent: set.counter to 10')
.fontSize(20).height(50)
.onClick(() => {
// 无法将value设置为10,UI不会刷新
this.counter[0].setSubCounter(10);
})
Text('Parent: reset entire counter')
.fontSize(20).height(50)
.onClick(() => {
this.counter = [new ParentCounter(1), new ParentCounter(2), new ParentCounter(3)];
})
}
}
}
}
```
对于Text('Parent: incr counter[0].counter')的onClick事件,this.counter[0].incrSubCounter(10)调用incrSubCounter方法使SubCounter的counter值增加10,UI同步刷新。
但是,在Text('Parent: set.counter to 10')的onClick中调用this.counter[0].setSubCounter(10),SubCounter的counter值却无法重置为10。
incrSubCounter和setSubCounter都是同一个SubCounter的函数。在第一个点击处理时调用incrSubCounter可以正确更新UI,而第二个点击处理调用setSubCounter时却没有更新UI。实际上incrSubCounter和setSubCounter两个函数都不能触发Text('${this.value.subCounter.counter}')的更新,因为\@ObjectLink value : ParentCounter仅能观察其代理ParentCounter的属性,对于this.value.subCounter.counter是SubCounter的属性,无法观察到嵌套类的属性。
但是,第一个click事件调用this.counter[0].incrCounter()将CounterComp自定义组件中\@ObjectLink value: ParentCounter标记为已更改。此时触发Text('${this.value.subCounter.counter}')的更新。 如果在第一个点击事件中删除this.counter[0].incrCounter(),也无法更新UI。
【正例】
对于上述问题,为了直接观察SubCounter中的属性,以便this.counter[0].setSubCounter(10)操作有效,可以利用下面的方法:
```ts
CounterComp({ value: this.counter[0] }); // ParentComp组件传递 ParentCounter 给 CounterComp 组件
@ObjectLink value:ParentCounter; // @ObjectLink 接收 ParentCounter
CounterChild({ subValue: this.value.subCounter }); // CounterComp组件 传递 SubCounter 给 CounterChild 组件
@ObjectLink subValue:SubCounter; // @ObjectLink 接收 SubCounter
```
该方法使得\@ObjectLink分别代理了ParentCounter和SubCounter的属性,这样对于这两个类的属性的变化都可以观察到,即都会对UI视图进行刷新。即使删除了上面所说的this.counter[0].incrCounter(),UI也会进行正确的刷新。
该方法可用于实现“两个层级”的观察,即外部对象和内部嵌套对象的观察。但是该方法只能用于\@ObjectLink装饰器,无法作用于\@Prop(\@Prop通过深拷贝传入对象)。详情参考[@Prop与@ObjectLink的差异](#prop与objectlink的差异)。
```ts
let nextId = 1;
@Observed
class SubCounter {
counter: number;
constructor(c: number) {
this.counter = c;
}
}
@Observed
class ParentCounter {
id: number;
counter: number;
subCounter: SubCounter;
incrCounter() {
this.counter++;
}
incrSubCounter(c: number) {
this.subCounter.counter += c;
}
setSubCounter(c: number): void {
this.subCounter.counter = c;
}
constructor(c: number) {
this.id = nextId++;
this.counter = c;
this.subCounter = new SubCounter(c);
}
}
@Component
struct CounterComp {
@ObjectLink value: ParentCounter;
build() {
Column({ space: 10 }) {
Text(`${this.value.counter}`)
.fontSize(25)
.onClick(() => {
this.value.incrCounter();
})
CounterChild({ subValue: this.value.subCounter })
Divider().height(2)
}
}
}
@Component
struct CounterChild {
@ObjectLink subValue: SubCounter;
build() {
Text(`${this.subValue.counter}`)
.onClick(() => {
this.subValue.counter += 1;
})
}
}
@Entry
@Component
struct ParentComp {
@State counter: ParentCounter[] = [new ParentCounter(1), new ParentCounter(2), new ParentCounter(3)];
build() {
Row() {
Column() {
CounterComp({ value: this.counter[0] })
CounterComp({ value: this.counter[1] })
CounterComp({ value: this.counter[2] })
Divider().height(5)
ForEach(this.counter,
(item: ParentCounter) => {
CounterComp({ value: item })
},
(item: ParentCounter) => item.id.toString()
)
Divider().height(5)
Text('Parent: reset entire counter')
.fontSize(20).height(50)
.onClick(() => {
this.counter = [new ParentCounter(1), new ParentCounter(2), new ParentCounter(3)];
})
Text('Parent: incr counter[0].counter')
.fontSize(20).height(50)
.onClick(() => {
this.counter[0].incrCounter();
this.counter[0].incrSubCounter(10);
})
Text('Parent: set.counter to 10')
.fontSize(20).height(50)
.onClick(() => {
this.counter[0].setSubCounter(10);
})
}
}
}
}
```
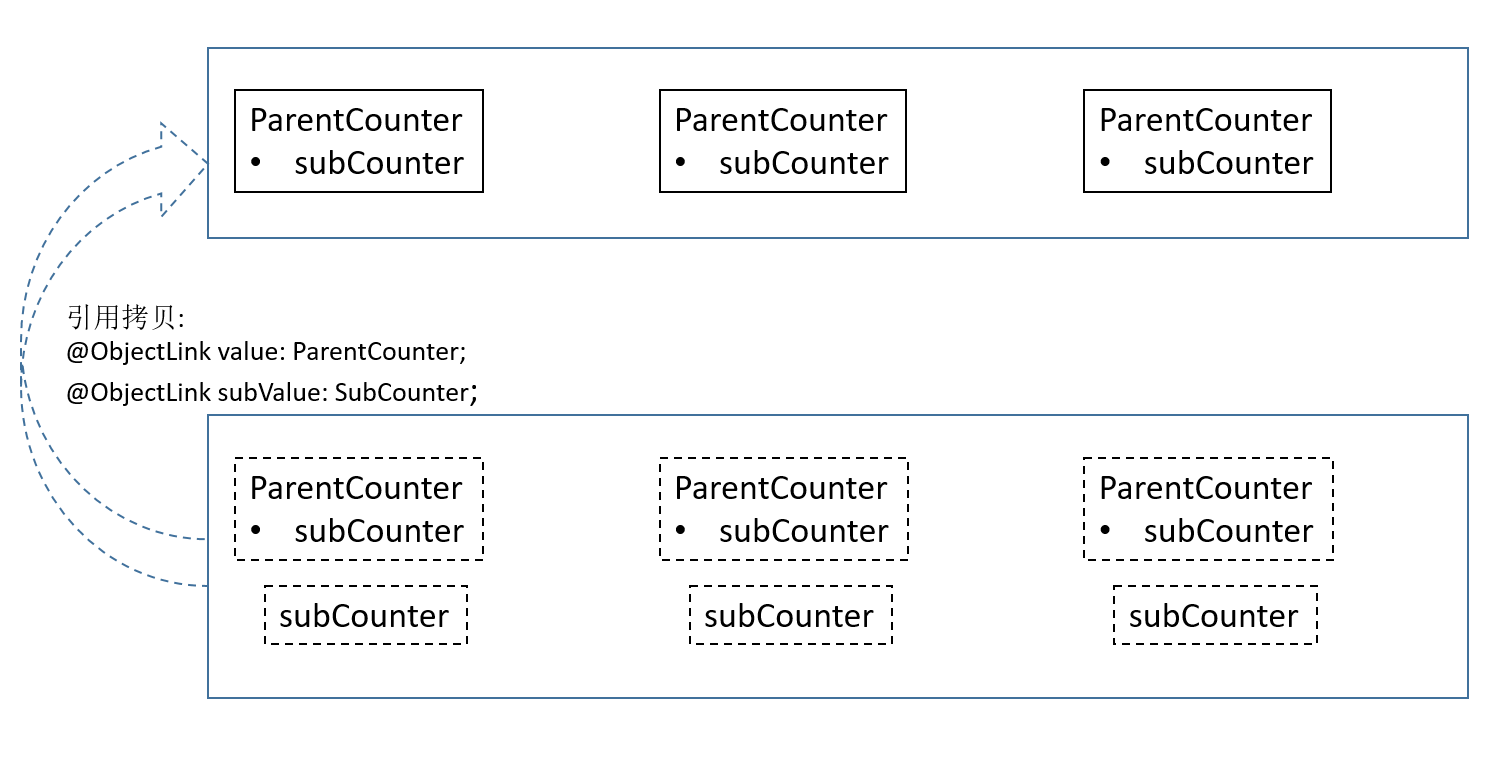
### \@Prop与\@ObjectLink的差异
在下面的示例代码中,\@ObjectLink装饰的变量是对数据源的引用,即this.value.subCounter和this.subValue都是同一个对象的不同引用,所以在点击CounterComp的click handler,改变this.value.subCounter.counter时,this.subValue.counter也会改变,对应的组件Text(`this.subValue.counter: ${this.subValue.counter}`)会刷新。
```ts
let nextId = 1;
@Observed
class SubCounter {
counter: number;
constructor(c: number) {
this.counter = c;
}
}
@Observed
class ParentCounter {
id: number;
counter: number;
subCounter: SubCounter;
incrCounter() {
this.counter++;
}
incrSubCounter(c: number) {
this.subCounter.counter += c;
}
setSubCounter(c: number): void {
this.subCounter.counter = c;
}
constructor(c: number) {
this.id = nextId++;
this.counter = c;
this.subCounter = new SubCounter(c);
}
}
@Component
struct CounterComp {
@ObjectLink value: ParentCounter;
build() {
Column({ space: 10 }) {
CountChild({ subValue: this.value.subCounter })
Text(`this.value.counter:increase 7 `)
.fontSize(30)
.onClick(() => {
// 点击后Text(`this.subValue.counter: ${this.subValue.counter}`)会刷新
this.value.incrSubCounter(7);
})
Divider().height(2)
}
}
}
@Component
struct CountChild {
@ObjectLink subValue: SubCounter;
build() {
Text(`this.subValue.counter: ${this.subValue.counter}`)
.fontSize(30)
}
}
@Entry
@Component
struct ParentComp {
@State counter: ParentCounter[] = [new ParentCounter(1), new ParentCounter(2), new ParentCounter(3)];
build() {
Row() {
Column() {
CounterComp({ value: this.counter[0] })
CounterComp({ value: this.counter[1] })
CounterComp({ value: this.counter[2] })
Divider().height(5)
ForEach(this.counter,
(item: ParentCounter) => {
CounterComp({ value: item })
},
(item: ParentCounter) => item.id.toString()
)
Divider().height(5)
Text('Parent: reset entire counter')
.fontSize(20).height(50)
.onClick(() => {
this.counter = [new ParentCounter(1), new ParentCounter(2), new ParentCounter(3)];
})
Text('Parent: incr counter[0].counter')
.fontSize(20).height(50)
.onClick(() => {
this.counter[0].incrCounter();
this.counter[0].incrSubCounter(10);
})
Text('Parent: set.counter to 10')
.fontSize(20).height(50)
.onClick(() => {
this.counter[0].setSubCounter(10);
})
}
}
}
}
```
\@ObjectLink图示如下:
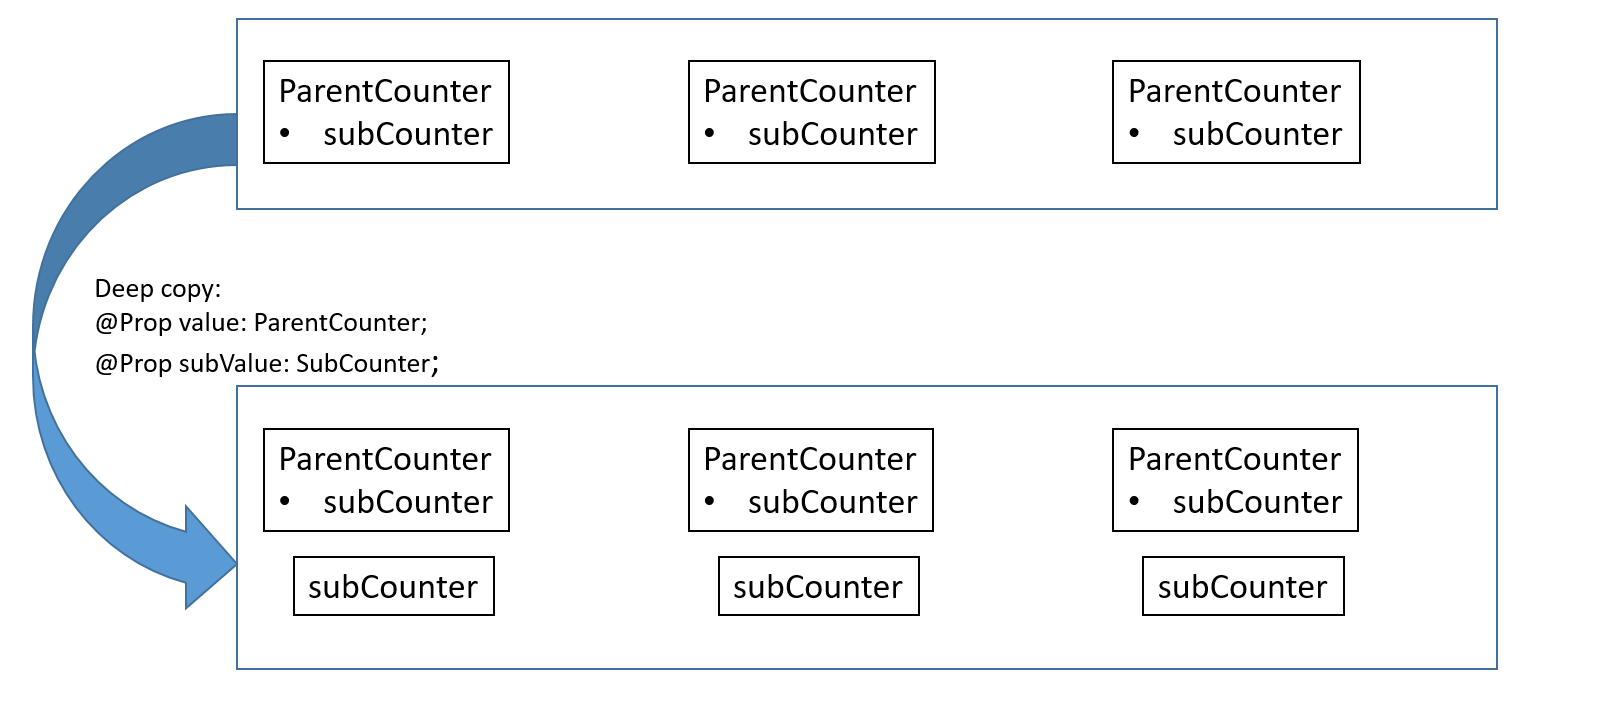
【反例】
如果用\@Prop替代\@ObjectLink。点击Text(`this.subValue.counter: ${this.subValue.counter}`),UI刷新正常。但是点击Text(`this.value.counter:increase 7 `),\@Prop 对变量做了一个本地拷贝,CounterComp的第一个Text并不会刷新。
this.value.subCounter和this.subValue并不是同一个对象。所以this.value.subCounter的改变,并没有改变this.subValue的拷贝对象,Text(`this.subValue.counter: ${this.subValue.counter}`)不会刷新。
```ts
@Component
struct CounterComp {
@Prop value: ParentCounter = new ParentCounter(0);
@Prop subValue: SubCounter = new SubCounter(0);
build() {
Column({ space: 10 }) {
Text(`this.subValue.counter: ${this.subValue.counter}`)
.fontSize(20)
.onClick(() => {
this.subValue.counter += 7;
})
Text(`this.value.counter:increase 7 `)
.fontSize(20)
.onClick(() => {
this.value.incrSubCounter(7);
})
Divider().height(2)
}
}
}
```
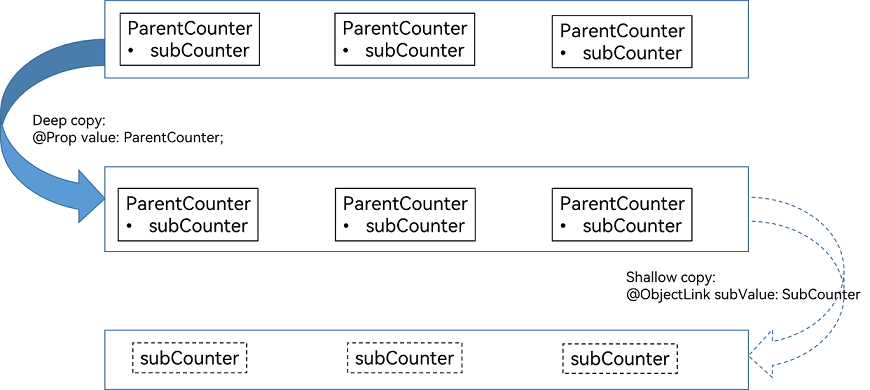
\@Prop拷贝的关系图示如下:
【正例】
可以通过从ParentComp到CounterComp仅拷贝一份\@Prop value: ParentCounter,同时必须避免再多拷贝一份SubCounter。
- 在CounterComp组件中只使用一个\@Prop counter:Counter。
- 添加另一个子组件SubCounterComp,其中包含\@ObjectLink subCounter: SubCounter。此\@ObjectLink可确保观察到SubCounter对象属性更改,并且UI更新正常。
- \@ObjectLink subCounter: SubCounter与CounterComp中的\@Prop counter:Counter的this.counter.subCounter共享相同的SubCounter对象。
```ts
let nextId = 1;
@Observed
class SubCounter {
counter: number;
constructor(c: number) {
this.counter = c;
}
}
@Observed
class ParentCounter {
id: number;
counter: number;
subCounter: SubCounter;
incrCounter() {
this.counter++;
}
incrSubCounter(c: number) {
this.subCounter.counter += c;
}
setSubCounter(c: number): void {
this.subCounter.counter = c;
}
constructor(c: number) {
this.id = nextId++;
this.counter = c;
this.subCounter = new SubCounter(c);
}
}
@Component
struct SubCounterComp {
@ObjectLink subValue: SubCounter;
build() {
Text(`SubCounterComp: this.subValue.counter: ${this.subValue.counter}`)
.onClick(() => {
this.subValue.counter = 7;
})
}
}
@Component
struct CounterComp {
@Prop value: ParentCounter;
build() {
Column({ space: 10 }) {
Text(`this.value.incrCounter(): this.value.counter: ${this.value.counter}`)
.fontSize(20)
.onClick(() => {
this.value.incrCounter();
})
SubCounterComp({ subValue: this.value.subCounter })
Text(`this.value.incrSubCounter()`)
.onClick(() => {
this.value.incrSubCounter(77);
})
Divider().height(2)
}
}
}
@Entry
@Component
struct ParentComp {
@State counter: ParentCounter[] = [new ParentCounter(1), new ParentCounter(2), new ParentCounter(3)];
build() {
Row() {
Column() {
CounterComp({ value: this.counter[0] })
CounterComp({ value: this.counter[1] })
CounterComp({ value: this.counter[2] })
Divider().height(5)
ForEach(this.counter,
(item: ParentCounter) => {
CounterComp({ value: item })
},
(item: ParentCounter) => item.id.toString()
)
Divider().height(5)
Text('Parent: reset entire counter')
.fontSize(20).height(50)
.onClick(() => {
this.counter = [new ParentCounter(1), new ParentCounter(2), new ParentCounter(3)];
})
Text('Parent: incr counter[0].counter')
.fontSize(20).height(50)
.onClick(() => {
this.counter[0].incrCounter();
this.counter[0].incrSubCounter(10);
})
Text('Parent: set.counter to 10')
.fontSize(20).height(50)
.onClick(() => {
this.counter[0].setSubCounter(10);
})
}
}
}
}
```
拷贝关系图示如下:
### 在@Observed装饰类的构造函数中延时更改成员变量
在状态管理中,使用@Observed装饰类后,会给该类使用一层“代理”进行包装。当在组件中改变该类的成员变量时,会被该代理进行拦截,在更改数据源中值的同时,也会将变化通知给绑定的组件,从而实现观测变化与触发刷新。
当开发者在类的构造函数中对成员变量进行赋值或者修改时,此修改不会经过代理(因为是直接对数据源中的值进行修改),也就无法被观测到。所以,如果开发者在类的构造函数中使用定时器修改类中的成员变量,即使该修改成功执行了,也不会触发UI的刷新。
【反例】
```ts
@Observed
class RenderClass {
waitToRender: boolean = false;
constructor() {
setTimeout(() => {
this.waitToRender = true;
console.log("更改waitToRender的值为:" + this.waitToRender);
}, 1000)
}
}
@Entry
@Component
struct Index {
@State @Watch('renderClassChange') renderClass: RenderClass = new RenderClass();
@State textColor: Color = Color.Black;
renderClassChange() {
console.log("renderClass的值被更改为:" + this.renderClass.waitToRender);
}
build() {
Row() {
Column() {
Text("renderClass的值为:" + this.renderClass.waitToRender)
.fontSize(20)
.fontColor(this.textColor)
Button("Show")
.onClick(() => {
// 使用其他状态变量强行刷新UI的做法并不推荐,此处仅用来检测waitToRender的值是否更新
this.textColor = Color.Red;
})
}
.width('100%')
}
.height('100%')
}
}
```
上文的示例代码中在RenderClass的构造函数中使用定时器在1秒后修改了waitToRender的值,但是不会触发UI的刷新。此时点击按钮,强行刷新Text组件可以看到waitToRender的值已经被修改成了true。
【正例】
```ts
@Observed
class RenderClass {
waitToRender: boolean = false;
constructor() {
}
}
@Entry
@Component
struct Index {
@State @Watch('renderClassChange') renderClass: RenderClass = new RenderClass();
renderClassChange() {
console.log("renderClass的值被更改为:" + this.renderClass.waitToRender);
}
onPageShow() {
setTimeout(() => {
this.renderClass.waitToRender = true;
console.log("更改renderClass的值为:" + this.renderClass.waitToRender);
}, 1000)
}
build() {
Row() {
Column() {
Text("renderClass的值为:" + this.renderClass.waitToRender)
.fontSize(20)
}
.width('100%')
}
.height('100%')
}
}
```
上文的示例代码将定时器修改移入到组件内,此时界面显示时会先显示“renderClass的值为:false”。待定时器触发时,renderClass的值改变,触发[@Watch](./arkts-watch.md)回调,此时界面刷新显示“renderClass的值为:true”,日志输出“renderClass的值被更改为:true”。
因此,更推荐开发者在组件中对@Observed装饰的类成员变量进行修改实现刷新。
### \@ObjectLink数据源更新时机
```ts
@Observed
class Person {
name: string = '';
age: number = 0;
constructor(name: string, age: number) {
this.name = name;
this.age = age;
}
}
@Observed
class Info {
person: Person;
constructor(person: Person) {
this.person = person;
}
}
@Entry
@Component
struct Parent {
@State @Watch('onChange01') info: Info = new Info(new Person('Bob', 10));
onChange01() {
console.log(':::onChange01:' + this.info.person.name); // 2
}
build() {
Column() {
Text(this.info.person.name).height(40)
Child({
per: this.info.person, clickEvent: () => {
console.log(':::clickEvent before', this.info.person.name); // 1
this.info.person = new Person('Jack', 12);
console.log(':::clickEvent after', this.info.person.name); // 3
}
})
}
}
}
@Component
struct Child {
@ObjectLink @Watch('onChange02') per: Person;
clickEvent?: () => void;
onChange02() {
console.log(':::onChange02:' + this.per.name); // 5
}
build() {
Column() {
Button(this.per.name)
.height(40)
.onClick(() => {
this.onClickType();
})
}
}
private onClickType() {
if (this.clickEvent) {
this.clickEvent();
}
console.log(':::--------此时Child中的this.per.name值仍然是:' + this.per.name); // 4
}
}
```
\@ObjectLink的数据源更新依赖其父组件,当父组件中数据源改变引起父组件刷新时,会重新设置子组件\@ObjectLink的数据源。这个过程不是在父组件数据源变化后立刻发生的,而是在父组件实际刷新时才会进行。上述示例中,Parent包含Child,Parent传递箭头函数给Child,在点击时,日志打印顺序是1-2-3-4-5,打印到日志4时,点击事件流程结束,此时仅仅是将子组件Child标记为需要父组件更新的节点,因此日志4打印的this.per.name的值仍为Bob,等到父组件真正更新时,才会更新Child的数据源。
当@ObjectLink @Watch('onChange02') per: Person的\@Watch函数执行时,说明\@ObjectLink的数据源已被父组件更新,此时日志5打印的值为更新后的Jack。
日志的含义为:
- 日志1:对Parent @State @Watch('onChange01') info: Info = new Info(new Person('Bob', 10)) 赋值前。
- 日志2:对Parent @State @Watch('onChange01') info: Info = new Info(new Person('Bob', 10)) 赋值,执行其\@Watch函数,同步执行。
- 日志3:对Parent @State @Watch('onChange01') info: Info = new Info(new Person('Bob', 10)) 赋值完成。
- 日志4:onClickType方法内clickEvent执行完,此时只是将子组件Child标记为需要父组件更新的节点,未将最新的值更新给Child @ObjectLink @Watch('onChange02') per: Person,所以日志4打印的this.per.name的值仍然是Bob。
- 日志5:下一次vsync信号触发Child更新,@ObjectLink @Watch('onChange02') per: Person被更新,触发其\@Watch方法,此时@ObjectLink @Watch('onChange02') per: Person为新值Jack。
\@Prop父子同步原理同\@ObjectLink一致。
当clickEvent中更改this.info.person.name时,修改会立刻生效,此时日志4打印的值是Jack。
```ts
Child({
per: this.info.person, clickEvent: () => {
console.log(':::clickEvent before', this.info.person.name); // 1
this.info.person.name = 'Jack';
console.log(':::clickEvent after', this.info.person.name); // 3
}
})
```
此时Parent中Text组件不会刷新,因为this.info.person.name属于两层嵌套。
### 使用a.b(this.object)形式调用,不会触发UI刷新
在build方法内,当@Observed与@ObjectLink联合装饰的变量是Object类型、且通过a.b(this.object)形式调用时,b方法内传入的是this.object的原生对象,修改其属性,无法触发UI刷新。如下例中,通过静态方法或者使用this调用组件内部方法,修改组件中的this.weather.temperature时,UI不会刷新。
【反例】
```ts
@Observed
class Weather {
temperature:number;
constructor(temperature:number) {
this.temperature = temperature;
}
static increaseTemperature(weather:Weather) {
weather.temperature++;
}
}
class Day {
weather:Weather;
week:string;
constructor(weather:Weather, week:string) {
this.weather = weather;
this.week = week;
}
}
@Entry
@Component
struct Parent {
@State day1: Day = new Day(new Weather(15), 'Monday');
build() {
Column({ space:10 }) {
Child({ weather: this.day1.weather})
}
.height('100%')
.width('100%')
}
}
@Component
struct Child {
@ObjectLink weather: Weather;
reduceTemperature (weather:Weather) {
weather.temperature--;
}
build() {
Column({ space:10 }) {
Text(`The temperature of day1 is ${this.weather.temperature} degrees.`)
.fontSize(20)
Button('increaseTemperature')
.onClick(()=>{
// 通过静态方法调用,无法触发UI刷新
Weather.increaseTemperature(this.weather);
})
Button('reduceTemperature')
.onClick(()=>{
// 使用this通过自定义组件内部方法调用,无法触发UI刷新
this.reduceTemperature(this.weather);
})
}
.height('100%')
.width('100%')
}
}
```
可以通过如下先赋值、再调用新赋值的变量的方式为this.weather加上Proxy代理,实现UI刷新。
【正例】
```ts
@Observed
class Weather {
temperature:number;
constructor(temperature:number) {
this.temperature = temperature;
}
static increaseTemperature(weather:Weather) {
weather.temperature++;
}
}
class Day {
weather:Weather;
week:string;
constructor(weather:Weather, week:string) {
this.weather = weather;
this.week = week;
}
}
@Entry
@Component
struct Parent {
@State day1: Day = new Day(new Weather(15), 'Monday');
build() {
Column({ space:10 }) {
Child({ weather: this.day1.weather})
}
.height('100%')
.width('100%')
}
}
@Component
struct Child {
@ObjectLink weather: Weather;
reduceTemperature (weather:Weather) {
weather.temperature--;
}
build() {
Column({ space:10 }) {
Text(`The temperature of day1 is ${this.weather.temperature} degrees.`)
.fontSize(20)
Button('increaseTemperature')
.onClick(()=>{
// 通过赋值添加 Proxy 代理
let weather1 = this.weather;
Weather.increaseTemperature(weather1);
})
Button('reduceTemperature')
.onClick(()=>{
// 通过赋值添加 Proxy 代理
let weather2 = this.weather;
this.reduceTemperature(weather2);
})
}
.height('100%')
.width('100%')
}
}
```