# 自动化测试框架使用指导
## 概述
自动化测试框架arkxtest,作为工具集的重要组成部分,支持JS/TS语言的单元测试框架(JsUnit)及UI测试框架(UiTest)。
JsUnit提供单元测试用例执行能力,提供用例编写基础接口,生成对应报告,用于测试系统或应用接口。
UiTest通过简洁易用的API提供查找和操作界面控件能力,支持用户开发基于界面操作的自动化测试脚本。
本指南介绍了测试框架的主要功能、实现原理、环境准备,以及测试脚本编写和执行方法。同时,以shell命令方式,对外提供了获取截屏、控件树、录制用户操作、便捷注入UI模拟操作等能力,助力开发者更灵活方便测试和验证。
## 实现原理
测试框架分为单元测试框架和UI测试框架。
单元测试框架是测试框架的基础底座,提供了最基本的用例识别、调度、执行及结果汇总的能力。
UI测试框架主要对外提供了UiTest API供开发人员在对应测试场景调用,而其脚本的运行基础仍是单元测试框架。
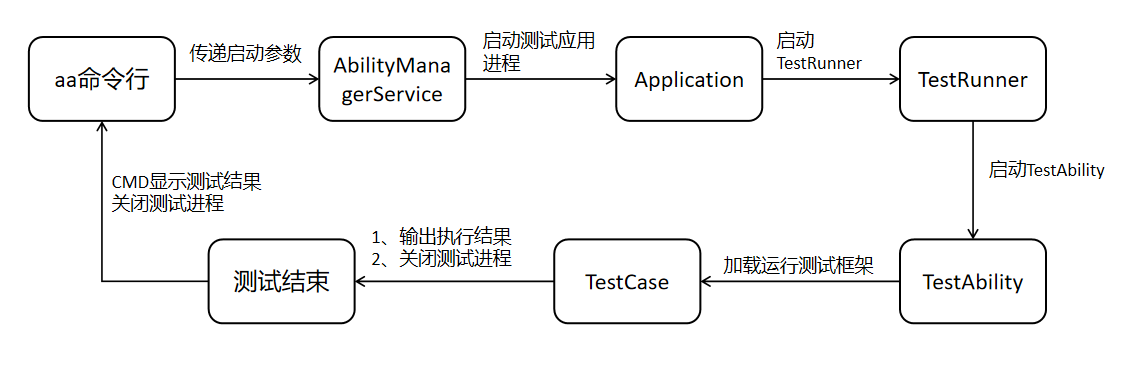
### 单元测试框架
图1.单元测试框架主要功能
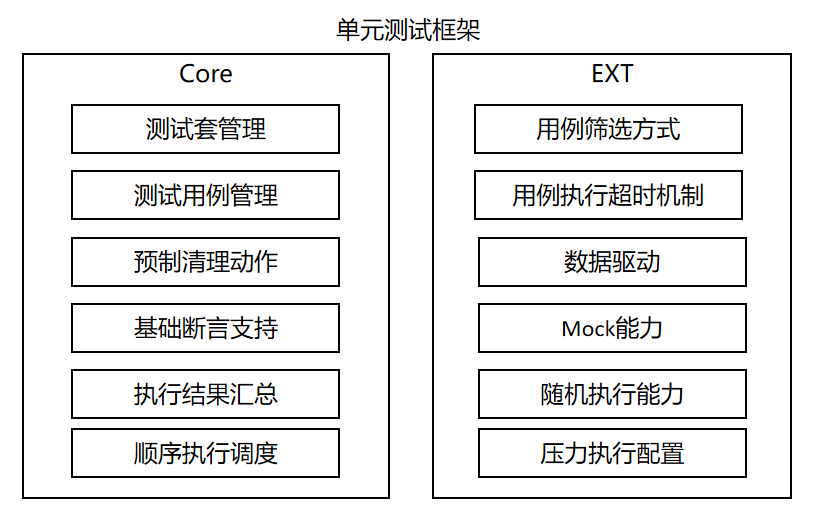
图2.脚本基础流程运行图
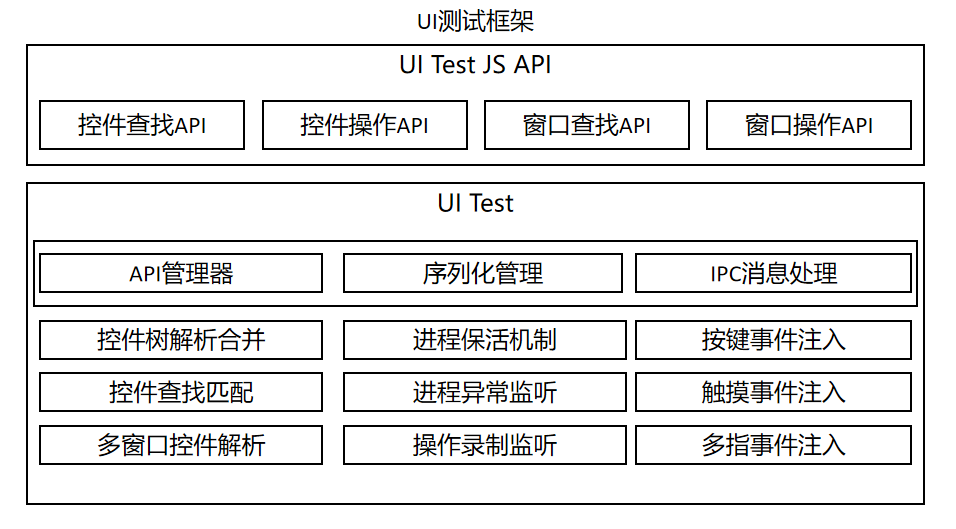
### UI测试框架
图3.UI测试框架主要功能
## 基于ArkTS编写和执行测试
### 搭建环境
DevEco Studio可参考其官网介绍进行[下载](https://developer.harmonyos.com/cn/develop/deveco-studio#download),并进行相关的配置动作。
### 新建和编写测试脚本
#### 新建测试脚本
在DevEco Studio中新建应用开发工程,其中ohos目录即为测试脚本所在的目录。
在工程目录下打开待测试模块下的ets文件,将光标置于代码中任意位置,单击**右键 > Show Context Actions** **> Create Ohos Test**或快捷键**Alt+enter** **> Create Ohos Test**创建测试类,更多指导请参考DevEco Studio中[指导](https://developer.harmonyos.com/cn/docs/documentation/doc-guides-V3/harmonyos_jnit_jsunit-0000001092459608-V3?catalogVersion=V3#section13366184061415)。
#### 编写单元测试脚本
本章节主要描述单元测试框架支持能力,以及能力的使用方法, 具体请参考[单元测试框架功能特性](https://gitee.com/openharmony/testfwk_arkxtest/blob/master/README_zh.md#%E5%8D%95%E5%85%83%E6%B5%8B%E8%AF%95%E6%A1%86%E6%9E%B6%E5%8A%9F%E8%83%BD%E7%89%B9%E6%80%A7)。
在单元测试框架,测试脚本需要包含如下基本元素:
1、依赖导包,以便使用依赖的测试接口。
2、测试代码编写,主要编写测试代码的相关逻辑,如接口调用等。
3、断言接口调用,设置测试代码中的检查点,如无检查点,则不可认为一个完整的测试脚本。
如下示例代码实现的场景是:启动测试页面,检查设备当前显示的页面是否为预期页面。
```ts
import { describe, it, expect } from '@ohos/hypium';
import { abilityDelegatorRegistry } from '@kit.TestKit';
import { UIAbility, Want } from '@kit.AbilityKit';
const delegator = abilityDelegatorRegistry.getAbilityDelegator()
const bundleName = abilityDelegatorRegistry.getArguments().bundleName;
function sleep(time: number) {
return new Promise((resolve: Function) => setTimeout(resolve, time));
}
export default function abilityTest() {
describe('ActsAbilityTest', () =>{
it('testUiExample',0, async (done: Function) => {
console.info("uitest: TestUiExample begin");
//start tested ability
const want: Want = {
bundleName: bundleName,
abilityName: 'EntryAbility'
}
await delegator.startAbility(want);
await sleep(1000);
//check top display ability
const ability: UIAbility = await delegator.getCurrentTopAbility();
console.info("get top ability");
expect(ability.context.abilityInfo.name).assertEqual('EntryAbility');
done();
})
})
}
```
#### 编写UI测试脚本
本章节主要介绍UI测试框架支持能力,以及对应能力API的使用方法。
UI测试基于单元测试,UI测试脚本在单元测试脚本上增加了对UiTest接口,具体请参考[API文档](../reference/apis-test-kit/js-apis-uitest.md)。
如下的示例代码是在上面的单元测试脚本基础上增量编写,实现的场景是:在启动的应用页面上进行点击操作,然后检测当前页面变化是否为预期变化。
1. 编写Index.ets页面代码, 作为被测示例demo。
```ts
@Entry
@Component
struct Index {
@State message: string = 'Hello World'
build() {
Row() {
Column() {
Text(this.message)
.fontSize(50)
.fontWeight(FontWeight.Bold)
Text("Next")
.fontSize(50)
.margin({top:20})
.fontWeight(FontWeight.Bold)
Text("after click")
.fontSize(50)
.margin({top:20})
.fontWeight(FontWeight.Bold)
}
.width('100%')
}
.height('100%')
}
}
```
2. 在ohosTest > ets > test文件夹下.test.ets文件中编写具体测试代码。
```ts
import { describe, it, expect } from '@ohos/hypium';
// 导入测试依赖kit
import { abilityDelegatorRegistry, Driver, ON } from '@kit.TestKit';
import { UIAbility, Want } from '@kit.AbilityKit';
const delegator: abilityDelegatorRegistry.AbilityDelegator = abilityDelegatorRegistry.getAbilityDelegator()
const bundleName = abilityDelegatorRegistry.getArguments().bundleName;
function sleep(time: number) {
return new Promise((resolve: Function) => setTimeout(resolve, time));
}
export default function abilityTest() {
describe('ActsAbilityTest', () => {
it('testUiExample',0, async (done: Function) => {
console.info("uitest: TestUiExample begin");
//start tested ability
const want: Want = {
bundleName: bundleName,
abilityName: 'EntryAbility'
}
await delegator.startAbility(want);
await sleep(1000);
//check top display ability
const ability: UIAbility = await delegator.getCurrentTopAbility();
console.info("get top ability");
expect(ability.context.abilityInfo.name).assertEqual('EntryAbility');
//ui test code
//init driver
const driver = Driver.create();
await driver.delayMs(1000);
//find button on text 'Next'
const button = await driver.findComponent(ON.text('Next'));
//click button
await button.click();
await driver.delayMs(1000);
//check text
await driver.assertComponentExist(ON.text('after click'));
await driver.pressBack();
done();
})
})
}
```
### 执行测试脚本
#### 在DevEco Studio执行
脚本执行需要连接硬件设备。通过点击按钮执行,当前支持以下执行方式:
1、测试包级别执行,即执行测试包内的全部用例。
2、测试套级别执行,即执行describe方法中定义的全部测试用例。
3、测试方法级别执行,即执行指定it方法也就是单条测试用例。
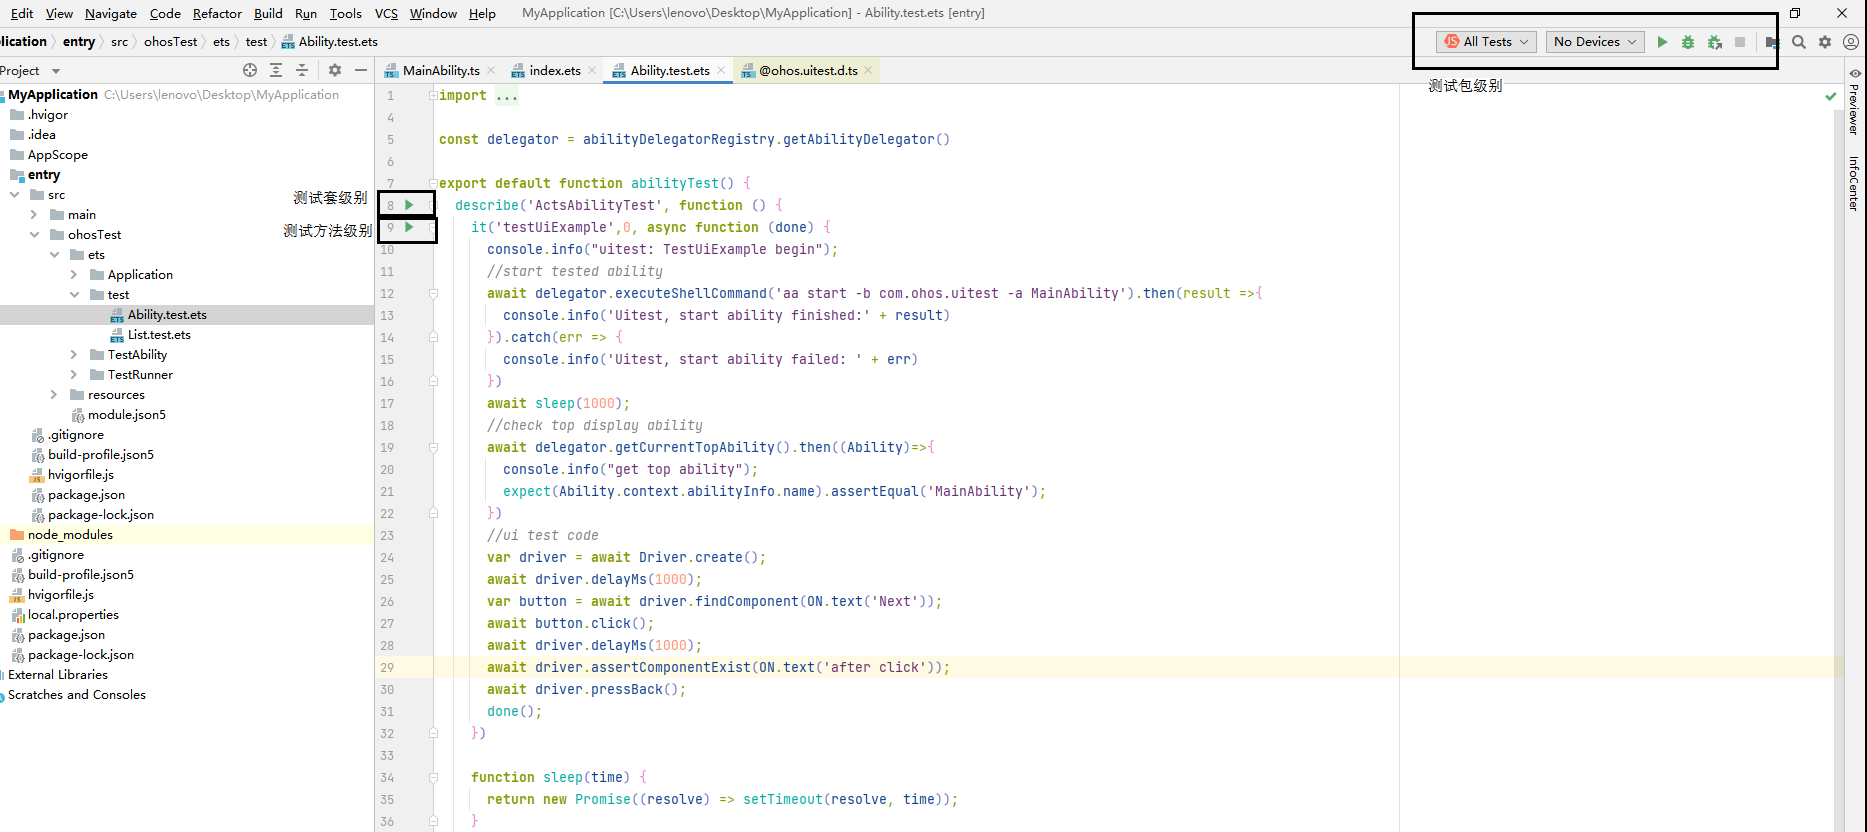
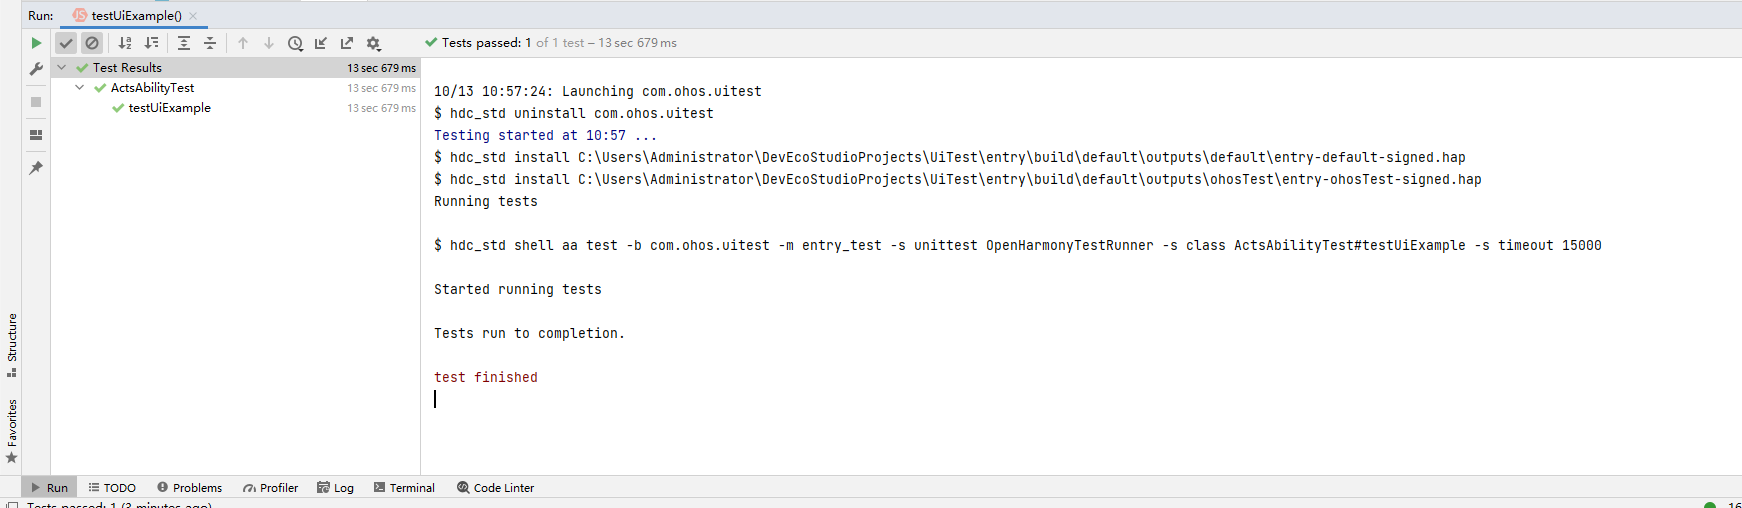
**查看测试结果**
测试执行完毕后可直接在DevEco Studio中查看测试结果,如下图示例所示:
**查看测试用例覆盖率**
执行完测试用例后可以查看测试用例覆盖率,具体操作请参考[代码测试](https://developer.huawei.com/consumer/cn/doc/harmonyos-guides-V5/ide-code-test-V5)下各章节内的覆盖率统计模式。
#### 在CMD执行
脚本执行需要连接硬件设备,将应用测试包安装到测试设备上,在cmd窗口中执行aa命令,完成对用例测试。
> **说明:**
>
> 使用cmd的方式,需要配置好hdc相关的环境变量。
**aa test命令执行配置参数**
| 执行参数全写 | 执行参数缩写 | 执行参数含义 | 执行参数示例 |
| ------------- | ------------ | -------------------------------------- | ---------------------------------- |
| --bundleName | -b | 应用Bundle名称 | - b com.test.example |
| --packageName | -p | 应用模块名,适用于FA模型应用 | - p com.test.example.entry |
| --moduleName | -m | 应用模块名,适用于STAGE模型应用 | -m entry |
| NA | -s | 特定参数,以键值对方式传入 | - s unittest /ets/testrunner/OpenHarmonyTestRunner |
框架当前支持多种用例执行方式,通过上表中的-s参数后的配置键值对参数传入触发,如下表所示。
| 配置参数名 | 配置参数含义 | 配置参数取值 | 配置参数示例 |
| ------------ | ----------------------------------------------------------------------------- | ------------------------------------------------------------ | ----------------------------------------- |
| unittest | 用例执行所使用OpenHarmonyTestRunner对象 | OpenHarmonyTestRunner或用户自定义runner名称 | - s unittest OpenHarmonyTestRunner |
| class | 指定要执行的测试套或测试用例 | {describeName}#{itName},{describeName} | -s class attributeTest#testAttributeIt |
| notClass | 指定不需要执行的测试套或测试用例 | {describeName}#{itName},{describeName} | -s notClass attributeTest#testAttributeIt |
| itName | 指定要执行的测试用例 | {itName} | -s itName testAttributeIt |
| timeout | 测试用例执行的超时时间 | 正整数(单位ms),如不设置默认为 5000 | -s timeout 15000 |
| breakOnError | 遇错即停模式,当执行用例断言失败或者发生错误时,退出测试执行流程 | true/false(默认值) | -s breakOnError true |
| random | 测试用例随机顺序执行 | true/false(默认值) | -s random true |
| testType | 指定要执行用例的用例类型 | function,performance,power,reliability, security,global,compatibility,user,standard,safety,resilience' | -s testType function |
| level | 指定要执行用例的用例级别 | 0,1,2,3,4 | -s level 0 |
| size | 指定要执行用例的用例规模 | small,medium,large | -s size small
| stress | 指定要执行用例的执行次数 | 正整数 | -s stress 1000 |
**在cmd窗口执行test命令**
> **说明:**
>
>参数配置和命令均是基于Stage模型。
示例代码1:执行所有测试用例。
```shell
hdc shell aa test -b xxx -m xxx -s unittest OpenHarmonyTestRunner
```
示例代码2:执行指定的describe测试套用例,指定多个需用逗号隔开。
```shell
hdc shell aa test -b xxx -m xxx -s unittest OpenHarmonyTestRunner -s class s1,s2
```
示例代码3:执行指定测试套中指定的用例,指定多个需用逗号隔开。
```shell
hdc shell aa test -b xxx -m xxx -s unittest OpenHarmonyTestRunner -s class testStop#stop_1,testStop1#stop_0
```
示例代码4:执行指定除配置以外的所有的用例,设置不执行多个测试套需用逗号隔开。
```shell
hdc shell aa test -b xxx -m xxx -s unittest OpenHarmonyTestRunner -s notClass testStop
```
示例代码5:执行指定it名称的所有用例,指定多个需用逗号隔开。
```shell
hdc shell aa test -b xxx -m xxx -s unittest OpenHarmonyTestRunner -s itName stop_0
```
示例代码6:用例执行超时时长配置。
```shell
hdc shell aa test -b xxx -m xxx -s unittest OpenHarmonyTestRunner -s timeout 15000
```
示例代码7:用例以breakOnError模式执行用例。
```shell
hdc shell aa test -b xxx -m xxx -s unittest OpenHarmonyTestRunner -s breakOnError true
```
示例代码8:执行测试类型匹配的测试用例。
```shell
hdc shell aa test -b xxx -m xxx -s unittest OpenHarmonyTestRunner -s testType function
```
示例代码9:执行测试级别匹配的测试用例。
```shell
hdc shell aa test -b xxx -m xxx -s unittest OpenHarmonyTestRunner -s level 0
```
示例代码10:执行测试规模匹配的测试用例。
```shell
hdc shell aa test -b xxx -m xxx -s unittest OpenHarmonyTestRunner -s size small
```
示例代码11:执行测试用例指定次数。
```shell
hdc shell aa test -b xxx -m xxx -s unittest OpenHarmonyTestRunner -s stress 1000
```
**查看测试结果**
- cmd模式执行过程,会打印如下相关日志信息。
```
OHOS_REPORT_STATUS: class=testStop
OHOS_REPORT_STATUS: current=1
OHOS_REPORT_STATUS: id=JS
OHOS_REPORT_STATUS: numtests=447
OHOS_REPORT_STATUS: stream=
OHOS_REPORT_STATUS: test=stop_0
OHOS_REPORT_STATUS_CODE: 1
OHOS_REPORT_STATUS: class=testStop
OHOS_REPORT_STATUS: current=1
OHOS_REPORT_STATUS: id=JS
OHOS_REPORT_STATUS: numtests=447
OHOS_REPORT_STATUS: stream=
OHOS_REPORT_STATUS: test=stop_0
OHOS_REPORT_STATUS_CODE: 0
OHOS_REPORT_STATUS: consuming=4
```
| 日志输出字段 | 日志输出字段含义 |
| ------- | -------------------------|
| OHOS_REPORT_SUM | 当前测试套用例总数。 |
| OHOS_REPORT_STATUS: class | 当前执行用例测试套名称。|
| OHOS_REPORT_STATUS: id | 用例执行语言,默认JS。 |
| OHOS_REPORT_STATUS: numtests | 测试包中测试用例总数 。|
| OHOS_REPORT_STATUS: stream | 当前用例发生错误时,记录错误信息。 |
| OHOS_REPORT_STATUS: test| 当前用例执行的it name。 |
| OHOS_REPORT_STATUS_CODE | 当前用例执行结果状态。0表示通过,1表示错误,2表示失败。|
| OHOS_REPORT_STATUS: consuming | 当前用例执行消耗的时长(ms)。 |
- cmd执行完成后,会打印如下相关日志信息。
```
OHOS_REPORT_RESULT: stream=Tests run: 447, Failure: 0, Error: 1, Pass: 201, Ignore: 245
OHOS_REPORT_CODE: 0
OHOS_REPORT_RESULT: breakOnError model, Stopping whole test suite if one specific test case failed or error
OHOS_REPORT_STATUS: taskconsuming=16029
```
| 日志输出字段 | 日志输出字段含义 |
| ------------------| -------------------------|
| run | 当前测试包用例总数。 |
| Failure | 当前测试失败用例个数。 |
| Error | 当前执行用例发生错误用例个数。 |
| Pass | 当前执行用例通过用例个数 。|
| Ignore | 当前未执行用例个数。 |
| taskconsuming| 执行当前测试用例总耗时(ms)。 |
> **说明:**
>
> 当处于breakOnError模式,用例发生错误时,注意查看Ignore以及中断说明。
## 基于shell命令测试
在开发过程中,若需要快速进行截屏、 录屏、注入UI模拟操作、获取控件树等操作,可以使用shell命令,更方便完成相应测试。
> **说明:**
>
> 使用cmd的方式,需要配置好hdc相关的环境变量。
**命令列表**
| 命令 | 配置参数 |描述 |
|---------------|---------------------------------|---------------------------------|
| help | help| 显示uitest工具能够支持的命令信息。 |
| screenCap |[-p] | 截屏。非必填。
指定存储路径和文件名, 只支持存放在/data/local/tmp/下。
默认存储路径:/data/local/tmp,文件名:时间戳 + .png。 |
| dumpLayout |[-p] \<-i \| -a>|支持在daemon运行时执行获取控件树。
**-p** :指定存储路径和文件名, 只支持存放在/data/local/tmp/下。默认存储路径:/data/local/tmp,文件名:时间戳 + .json。
**-i** :不过滤不可见控件,也不做窗口合并。
**-a** :保存 BackgroundColor、 Content、FontColor、FontSize、extraAttrs 属性数据。
**默认** :不保存上述属性数据。
**-a和-i** 不可同时使用。 |
| uiRecord | uiRecord \|录制Ui操作。
**record** :开始录制,将当前界面操作记录到/data/local/tmp/record.csv,结束录制操作使用Ctrl+C结束录制。
**read** :读取并且打印录制数据。
各参数代表的含义请参考[用户录制操作](#用户录制操作)。|
| uiInput | \| 注入UI模拟操作。
各参数代表的含义请参考[注入ui模拟操作](#注入ui模拟操作)。 |
| --version | --version|获取当前工具版本信息。 |
| start-daemon|start-daemon| 拉起uitest测试进程。 |
### 截图使用示例
```bash
# 存储路径:/data/local/tmp,文件名:时间戳 + .png。
hdc shell uitest screenCap
# 指定存储路径和文件名,存放在/data/local/tmp/下。
hdc shell uitest screenCap -p /data/local/tmp/1.png
```
### 获取控件树使用示例
```bash
hdc shell uitest dumpLayout -p /data/local/tmp/1.json
```
### 用户录制操作
>**说明**
>
> 录制过程中,需等待当前操作的识别结果在命令行输出后,再进行下一步操作。
```bash
# 将当前界面操作记录到/data/local/tmp/record.csv,结束录制操作使用Ctrl+C结束录制。
hdc shell uitest uiRecord record
# 读取并打印录制数据。
hdc shell uitest uiRecord read
```
以下举例为:record数据中包含的字段及字段含义,仅供参考
```
{
"ABILITY": "com.ohos.launcher.MainAbility", // 前台应用界面
"BUNDLE": "com.ohos.launcher", // 操作应用
"CENTER_X": "", // 预留字段,暂未使用
"CENTER_Y": "", // 预留字段,暂未使用
"EVENT_TYPE": "pointer", //
"LENGTH": "0", // 总体步长
"OP_TYPE": "click", //事件类型,当前支持点击、双击、长按、拖拽、滑动、抛滑动作录制
"VELO": "0.000000", // 离手速度
"direction.X": "0.000000",// 总体移动X方向
"direction.Y": "0.000000", // 总体移动Y方向
"duration": 33885000.0, // 手势操作持续时间
"fingerList": [{
"LENGTH": "0", // 总体步长
"MAX_VEL": "40000", // 最大速度
"VELO": "0.000000", // 离手速度
"W1_BOUNDS": "{"bottom":361,"left":37,"right":118,"top":280}", // 起点控件bounds
"W1_HIER": "ROOT,3,0,0,0,0,0,0,0,0,5,0,0,0,0,0,0,0", // 起点控件hierarchy
"W1_ID": "", // 起点控件id
"W1_Text": "", // 起点控件text
"W1_Type": "Image", // 起点控件类型
"W2_BOUNDS": "{"bottom":361,"left":37,"right":118,"top":280}", // 终点控件bounds
"W2_HIER": "ROOT,3,0,0,0,0,0,0,0,0,5,0,0,0,0,0,0,0", // 终点控件hierarchy
"W2_ID": "", // 终点控件id
"W2_Text": "", // 终点控件text
"W2_Type": "Image", // 终点控件类型
"X2_POSI": "47", // 终点X
"X_POSI": "47", // 起点X
"Y2_POSI": "301", // 终点Y
"Y_POSI": "301", // 起点Y
"direction.X": "0.000000", // x方向移动量
"direction.Y": "0.000000" // Y方向移动量
}],
"fingerNumber": "1" //手指数量
}
```
### 注入UI模拟操作
| 命令 | 必填 | 描述 |
|------|------|-----------------|
| help | 是 | uiInput命令相关帮助信息。 |
| click | 是 | 模拟单击操作。 |
| doubleClick | 是 | 模拟双击操作。 |
| longClick | 是 | 模拟长按操作。 |
| fling | 是 | 模拟快滑操作。 |
| swipe | 是 | 模拟慢滑操作。 |
| drag | 是 | 模拟拖拽操作。 |
| dircFling | 是 | 模拟指定方向滑动操作。 |
| inputText | 是 | 模拟输入框输入文本操作。 |
| keyEvent | 是 | 模拟实体按键事件(如:键盘,电源键,返回上一级,返回桌面等),以及组合按键操作。 |
#### uiInput click/doubleClick/longClick使用示例
| 配置参数 | 必填 | 描述 |
|---------|------|-----------------|
| point_x | 是 | 点击x坐标点。 |
| point_y | 是 | 点击y坐标点。 |
```shell
# 执行单击事件。
hdc shell uitest uiInput click 100 100
# 执行双击事件。
hdc shell uitest uiInput doubleClick 100 100
# 执行长按事件。
hdc shell uitest uiInput longClick 100 100
```
#### uiInput fling使用示例
| 配置参数 | 必填 | 描述 |
|------|------------------|-----------------|
| from_x | 是 | 滑动起点x坐标。 |
| from_y | 是 | 滑动起点y坐标。 |
| to_x | 是 | 滑动终点x坐标。 |
| to_y | 是 | 滑动终点y坐标。 |
| swipeVelocityPps_ | 否 | 滑动速度,单位: (px/s),取值范围:200-40000。
默认值: 600。 |
| stepLength_ | 否 | 滑动步长。默认值: 滑动距离/50。
**为实现更好的模拟效果,推荐参数缺省/使用默认值。** |
```shell
# 执行快滑操作,stepLength_缺省。
hdc shell uitest uiInput fling 10 10 200 200 500
```
#### uiInput swipe/drag使用示例
| 配置参数 | 必填 | 描述 |
|------|------------------|-----------------|
| from_x | 是 | 滑动起点x坐标。 |
| from_y | 是 | 滑动起点y坐标。 |
| to_x | 是 | 滑动终点x坐标。 |
| to_y | 是 | 滑动终点y坐标。 |
| swipeVelocityPps_ | 否 | 滑动速度,单位: (px/s),取值范围:200-40000。
默认值: 600。 |
```shell
# 执行慢滑操作。
hdc shell uitest uiInput swipe 10 10 200 200 500
# 执行拖拽操作。
hdc shell uitest uiInput drag 10 10 100 100 500
```
#### uiInput dircFling使用示例
| 配置参数 | 必填 | 描述 |
|-------------------|-------------|----------|
| direction | 否 | 滑动方向,取值范围:[0,1,2,3],默认值为0。
0代表向左滑动,1代表向右滑动,2代表向上滑动,3代表向下滑动。 |
| swipeVelocityPps_ | 否| 滑动速度,单位: (px/s),取值范围:200-40000。
默认值: 600。 |
| stepLength | 否 | 滑动步长。
默认值: 滑动距离/50。为更好的模拟效果,推荐参数缺省/使用默认值。 |
```shell
# 执行左滑操作
hdc shell uitest uiInput dircFling 0 500
# 执行向右滑动操作
hdc shell uitest uiInput dircFling 1 600
# 执行向上滑动操作。
hdc shell uitest uiInput dircFling 2
# 执行向下滑动操作。
hdc shell uitest uiInput dircFling 3
```
#### uiInput inputText使用示例
| 配置参数 | 必填 | 描述 |
|------|------------------|----------|
| point_x | 是 | 输入框x坐标点。 |
| point_y | 是 | 输入框y坐标点。 |
| text | 是 | 输入文本内容。 |
```shell
# 执行输入框输入操作。
hdc shell uitest uiInput inputText 100 100 hello
```
#### uiInput keyEvent使用示例
| 配置参数 | 必填 | 描述 |
|------|------|----------|
| keyID1 | 是 | 实体按键对应ID,取值范围:KeyCode/Back/Home/Power。
当取Back/Home/Power时,不支持输入组合键。 |
| keyID2 | 否 | 实体按键对应ID。 |
| keyID3 | 否 | 实体按键对应ID。 |
>**说明**
>
> 最多支持传入是三个键值,键值的具体取值请参考[KeyCode](../reference/apis-input-kit/js-apis-keycode.md)。
```shell
# 返回主页。
hdc shell uitest uiInput keyEvent Home
# 返回。
hdc shell uitest uiInput keyEvent Back
# 组合键粘贴。
hdc shell uitest uiInput keyEvent 2072 2038
```
### 获取版本信息
```bash
hdc shell uitest --version
```
### 拉起uitest测试进程
```shell
hdc shell uitest start-daemon
```
>**说明**
>
> 设备需调成开发者模式。
>
> 仅元能力aa test拉起的测试hap才能调用Uitest的能力。
>
> 测试hap的[APL等级级别](../security/AccessToken/app-permission-mgmt-overview.md#权限机制中的基本概念)需为system_basic、normal。
## 相关实例
### 单元测试脚本实例
#### 单元测试断言功能使用实例
介绍单元测试框架中支持的断言能力如何使用,具体代码请查看[断言能力示例](https://gitee.com/openharmony/applications_app_samples/blob/master/code/Project/Test/jsunit/entry/src/ohosTest/ets/test/assertExampleTest/assertExample.test.ets)
#### 单元测试测试套定义使用实例
介绍单元测试框架测试套嵌如何定义,包括嵌套定义能力,具体代码请参考[测试套嵌套示例](https://gitee.com/openharmony/applications_app_samples/blob/master/code/Project/Test/jsunit/entry/src/ohosTest/ets/test/coverExampleTest/coverExample.test.ets)
#### 单元测试测试应用自定义函数使用实例
介绍针对应用内自定义函数如何使用框架能力进行测试,具体代码请参考[应用自定义函数测试示例](https://gitee.com/openharmony/applications_app_samples/blob/master/code/Project/Test/jsunit/entry/src/ohosTest/ets/test/customExampleTest/customExample.test.ets)
#### 单元测试数据驱动能力使用实例
介绍测试框架数据驱动能力、脚本重复执行配置功能,具体代码请参考[数据驱动能力示例](https://gitee.com/openharmony/applications_app_samples/blob/master/code/Project/Test/jsunit/entry/src/ohosTest/ets/test/paramExampleTest/paramExample.test.ets)
### UI测试脚本实例(控件类)
#### 查找指定控件能力实例
介绍通过设置控件属性作为查找条件,在应用界面上查找组件对象,具体代码请参考[控件查找示例](https://gitee.com/openharmony/applications_app_samples/blob/master/code/Project/Test/uitest/entry/src/ohosTest/ets/test/findCommentExampleTest/Component/findCommentExample.test.ets)
#### 模拟点击操作事件能力实例
介绍模拟用户在应用界面上进行点击,长按,双击等事件,具体代码请参考[点击事件示例](https://gitee.com/openharmony/applications_app_samples/blob/master/code/Project/Test/uitest/entry/src/ohosTest/ets/test/operationExampleTest/ui/clickEvent.test.ets)
#### 模拟鼠标操作能力实例
介绍模拟鼠标左击、右击、滑轮事件,具体代码请参考[鼠标操作事件示例](https://gitee.com/openharmony/applications_app_samples/blob/master/code/Project/Test/uitest/entry/src/ohosTest/ets/test/operationExampleTest/ui/MouseEvent.test.ets)
#### 模拟文本输入能力实例
介绍模拟输入中文、英文文本内容,使用前提是针对可以输入文本的组件类似文本框等组件进行操作,具体代码请参考[文本输入能力示例](https://gitee.com/openharmony/applications_app_samples/blob/master/code/Project/Test/uitest/entry/src/ohosTest/ets/test/operationExampleTest/ui/InputEvent.test.ets)
#### 截图能力实例
介绍屏幕截图功能,包括指定区域截图能力,具体代码请参考[截图能力示例](https://gitee.com/openharmony/applications_app_samples/blob/master/code/Project/Test/uitest/entry/src/ohosTest/ets/test/operationExampleTest/ui/ScreenCapEvent.test.ets)
#### 模拟快滑操作能力实例
介绍模拟快滑操作能力,即在可滑动页面上进行滑动,滑动后手指离开屏幕,具体代码请参考[模拟快滑操作能力示例](https://gitee.com/openharmony/applications_app_samples/blob/master/code/Project/Test/uitest/entry/src/ohosTest/ets/test/operationExampleTest/ui/FlingEvent.test.ets)
#### 模拟慢滑操作能力实例
介绍模拟慢滑操作能力,即在可滑动页面上进行滑动,滑动后手指仍停留在屏幕,具体代码请参考[模拟慢滑操作能力示例](https://gitee.com/openharmony/applications_app_samples/blob/master/code/Project/Test/uitest/entry/src/ohosTest/ets/test/operationExampleTest/ui/SwipeEvent.test.ets)
#### 模拟缩放操作能力实例
介绍模拟缩放能力,即在支持放大缩小的图片上,模拟双指缩放操作的能力,具体代码请参考[模拟缩放操作能力示例](https://gitee.com/openharmony/applications_app_samples/blob/master/code/Project/Test/uitest/entry/src/ohosTest/ets/test/operationExampleTest/ui/PinchEvent.test.ets)
#### 模拟滚动到组件顶端或底端能力实例
介绍模拟针对滑动类组件,可以模拟操作直接滚动到组件顶端或底端,具体代码请参考[模拟滚动到组件顶端或底端示例](https://gitee.com/openharmony/applications_app_samples/blob/master/code/Project/Test/uitest/entry/src/ohosTest/ets/test/operationExampleTest/ui/ScrollerEvent.test.ets)
### UI测试脚本实例(窗口类)
#### 查找指定窗口能力实例
介绍通过应用报名查找应用窗口,具体代码请参考[查找指定窗口能力示例](https://gitee.com/openharmony/applications_app_samples/blob/master/code/Project/Test/uitest/entry/src/ohosTest/ets/test/findCommentExampleTest/window/findWindowExample.test.ets)
#### 模拟窗口移动能力实例
介绍模拟移动窗口到指定位置能力,具体代码请参考[模拟窗口移动示例](https://gitee.com/openharmony/applications_app_samples/blob/master/code/Project/Test/uitest/entry/src/ohosTest/ets/test/operationExampleTest/window/MoveToEvent.test.ets)
#### 模拟调整窗口大小能力实例
介绍模拟调整窗口大小能力,并可指定调整的具体方向,具体代码请参考[模拟调整窗口大小能力示例](https://gitee.com/openharmony/applications_app_samples/blob/master/code/Project/Test/uitest/entry/src/ohosTest/ets/test/operationExampleTest/window/ReSizeWindow.test.ets)
## 常见问题
### 单元测试用例常见问题
**1、用例中增加的打印日志在用例结果之后才打印**
**问题描述**
用例中增加的日志打印信息,没有在用例执行过程中出现,而是在用例执行结束之后才出现。
**可能原因**
此类情况只会存在于用例中有调用异步接口的情况,原则上用例中所有的日志信息均在用例执行结束之前打印。
**解决方法**
当被调用的异步接口多于一个时,建议将接口调用封装成Promise方式调用。
**2、执行用例时报error:fail to start ability**
**问题描述**
执行测试用例时候,用例执行失败,控制台返回错误:fail to start ability。
**可能原因**
测试包打包过程中出现问题,未将测试框架依赖文件打包在测试包中。
**解决方法**
检查测试包中是否包含OpenHarmonyTestRunner.abc文件,如没有则重新编译打包后再次执行测试。
**3、执行用例时报用例超时错误**
**问题描述**
用例执行结束,控制台提示execute time XXms错误,即用例执行超时。
**可能原因**
1.用例执行异步接口,但执行过程中没有执行到done函数,导致用例执行一直没有结束,直到超时结束。
2.用例调用函数耗时过长,超过用例执行设置的超时时间。
3.用例调用函数中断言失败,抛出失败异常,导致用例执行一直没有结束,直到超时结束。
**解决方法**
1.检查用例代码逻辑,确保即使断言失败场景认可走到done函数,保证用例执行结束。
2.可在IDE中Run/Debug Configurations中修改用例执行超时配置参数,避免用例执行超时。
3.检查用例代码逻辑,断言结果,确保断言Pass。
### UI测试用例常见问题
**1、失败日志有“Get windows failed/GetRootByWindow failed”错误信息**
**问题描述**
UI测试用例执行失败,查看hilog日志发现日志中有“Get windows failed/GetRootByWindow failed”错误信息。
**可能原因**
系统ArkUI开关未开启,导致被测试界面控件树信息未生成。
**解决方法**
执行如下命令,并重启设备再次执行用例。
```shell
hdc shell param set persist.ace.testmode.enabled 1
```
**2、失败日志有“uitest-api dose not allow calling concurrently”错误信息**
**问题描述**
UI测试用例执行失败,查看hilog日志发现日志中有“uitest-api dose not allow calling concurrently”错误信息。
**可能原因**
1.用例中UI测试框架提供异步接口没有增加await语法糖调用。
2.多进程执行UI测试用例,导致拉起多个UITest进程,框架不支持多进程调用。
**解决方法**
1.检查用例实现,异步接口增加await语法糖调用。
2.避免多进程执行UI测试用例。
**3、失败日志有“does not exist on current UI! Check if the UI has changed after you got the widget object”错误信息**
**问题描述**
UI测试用例执行失败,查看hilog日志发现日志中有“does not exist on current UI! Check if the UI has changed after you got the widget object”错误信息。
**可能原因**
在用例中代码查找到目标控件后,设备界面发生了变化,导致查找到的控件丢失,无法进行下一步的模拟操作。
**解决方法**
重新执行UI测试用例。